상단탭을 왼쪽으로 드래그하면 폴더별로 플레이가 가능하다.

http://www.google.com/support/forum/p/android/thread?tid=69b6774bbe77e236&hl=en
You can go to settings> applications and then on gallery clear data. This removes the picasa photos . Then don't sync picasa again. Worked perfectly for me.
Go to.
Settings> applications> manage applications> all> gallery> clear data
http://todayis.tistory.com/276
우분투나 데비안에서 고정 ip를 설정하는 방법이다.
데비안의 경우 설치 시 ip를 설정할 수 있지만, 우분투의 경우는 DHCP로 잡히기 때문에.. 필요에 따라 다시 설정을 해 주어야 한다.
먼저 네트워크 인터페이스를 내린다(중지 시킨다).
$ sudo ifdown eth0
네트워크 인터페이스 설정 파일을 자신의 상황에 맞게 수정한다.
$sudo vi /etc/network/interfaces
auto lo
iface lo inet loopback
auto eth0
iface eth0 inet static
address 192.168.0.2
netmask 255.255.255.0
network 192.168.0.0
broadcase 192.168.0.255
gateway 192.168.0.1
dns-nameservers 168.126.63.1 168.126.63.2
네임 서버를 수정한다.
$ sudo vi /etc/resolv.conf
nameserver 168.126.63.1
nameserver 168.126.63.2
네트워크 인터페이스를 올린다(다시 동작 시킨다).
$ sudo ifup eth0
ip 를 자동으로 할당받고 싶다면, '/etc/network/interfaces' 에서 iface eth0 inet static 이하의 부분을 iface eth0 inet dhcp 로 수정해 주면 된다.
bayron.tistory.com/entry/우분투에서-MAC-address-변경
sudo vim /etc/network/interfaces
auto eth0
iface eth0 inet dhcp
hwaddress ether 00:00:00:00:00:00
노란색 부분에 원하는 MAC address 입력.
sudo service /etc/init.d/networking restart
http://www.coolenjoy.net/bbs/cboard.php?board=32&no=2255
레지스터리로 하는법은
HKEY_LOCAL_MACHINE > System > CurrentControlSet > Services > Tcpip > Prameters > Interfaces가셔서 요상한 이름의 폴더중 자신의 아이피속성이 들어가있는 폴더 선택 후
새로만들기 > DWORD값 하시고 MTU라고 적으신 다음 원하시는 숫자 입력하시면 되지 않을까 합니다...
제가 아는 레지 수정방법은 XP에서 쓰던 방법이라.. 제대로 될진^^;;
cmd로 하는법은netsh interface ipv4 set subinterface "로컬 영역 연결" mtu=XXX store=persistent
자신의 어댑터 이름을 로컬 영역 연결에 입력 해주시구요.. MTU자리에 숫자입력하면 간단하게 수정됩니다
제어판->글꼴에는 폰트들을 파일로 안보여주고 묶어서 보여주기때문에 문제가 있는 폰트는 보여주지 않았을것으로 추측함)제어판->글꼴에선 보이지않던 .ttf파일이 os.listdir("c:\\windows\\fonts\\")로 보니까 멀쩡히 있더라. os.remove()로 제거하였다.php.ini의 upload_max_filesize와 post_max_size를 각각 2G씩 설정했을땐 아예 모든크기의 파일이 업로드되지 않았다.(큰 파일은 끝에서 멈춰버렸고 작은파일은 아예 진행이 안됨) 이유는 모르겠으나 추측하건데 post_max_size <= upload_max_filesize) 그랬거나2G의 G심볼을 이해하지 못해서 그랬을지도 모른다.(php 공식사이트엔 이해한다고 되어있다.)http://php.net/manual/en/ini.core.php
PHP allows shortcuts for bit values, including K (kilo), M (mega) and G (giga). PHP will do the conversions automatically if you use any of these. Be careful not to exceed the 32 bit signed integer limit (if you're using 32bit versions) as it will cause your script to fail.
http://stackoverflow.com/questions/2854283/writing-direct-to-disk-with-php
I don't believe the myth that 'memory_size' should be the size of the uploaded file. The files are definitely not kept in memory... instead uploaded chunks of 1MB each are stored under /var/tmp and later on rebuild under /tmp before moving to the web/user space.
I'm running a linux-box with only 64MB RAM, setting the memory_limit to 16MB and uploading files of sizes about 100MB is no problem at all! (http://php.net/manual/en/features.file-upload.php)
php.ini:; Whether to allow HTTP file uploads. file_uploads = On ; Temporary directory for HTTP uploaded files (will use system default if not ; specified). upload_tmp_dir = /home/tmp ; Maximum allowed size for uploaded files. upload_max_filesize = 2000000000 ; about 1.86G ; Maximum size of POST data that PHP will accept. post_max_size = 2147483648 ; 2G max_execution_time = 30 ; Maximum execution time of each script, in seconds max_input_time = 60 ; Maximum amount of time each script may spend parsing request data
upload_tmp_dirupload_max_filesize and post_max_sizepost_max_size는 HTTP POST Request의 최대 크기이므로 post_max_size사이즈를 좀더 크게 설정.('multipart/form-data' is also POST Request)max_execution_time and max_input_timehttp://www.radinks.com/upload/config.php
These settings define the maximum life time of the script and the time that the script should spend in accepting input. If several mega bytes of data are being transfered max_input_time should be reasonably high.
LimitRequestBody optionLimitRequestBody의 기본값은 0(무제한)이기때문에 따로 설정되어있지 않다면 만질필요가 없다.http://www.radinks.com/upload/config.php
The apache webserver has a LimitRequestBody configuration directive that restricts the size of all POST data regardless of the web scripting language in use. Some RPM installations sets limit request body to 512Kb. You will need to change this to a larger value or remove the entry altogether.
http://serverfault.com/questions/109557/best-practice-apache-file-upload
I think you're confusing Apache httpd (Web Server) with other Apache Group projects. Apache Group hosts the "Commons" project which a large collection of Java libraries for use in your own Java applications.
http://blog.naver.com/PostView.nhn?blogId=woodair&logNo=100090608241&parentCategoryNo=38&viewDate=¤tPage=1&listtype=0
raw 영상 , DVD 이미지 파일등 그 크기가 2기가 이상을 상회하는 파일들이 넘쳐나고 있는데 이와같은 파일을 웹을 통해 전송하기 위한 리눅스 컴파일 환경설정에 대한 내용입니다.
1. 커널 2.4 이상이어야 하며,
2. Apache2, PHP5 컴파일시 아래와 같은 컴파일 플레그를 지정함으로 2기가 이상의 대용량 처리 환경을 만들수가 있습니다.
shell] # CFLAGS="-D_LARGEFILE_SOURCE -D_FILE_OFFSET_BITS=64"
shell] # export CFLAGS
shell] # cd httpd-2.x.x
shell] # ./configure \
--prefix=/usr/local/apache2 \
--enable-mods-shared=all \
--enable-so
....
....
<nowiki></nowiki>태그의 미지원 혹은 불완전한 지원<pre></pre>태그안에서 줄바꿈을 인식하여 <p></p>로 감싼뒤 태그를 그대로 이스케이프하여 태그가 그대로 출력됨.getElementsByClass함수
    var options = {};
    options.interwiki = {};

    //var element = getElementsByClass('post-body entry-content');
    var element = getElementsByClass('wiki-content');
    for (var k = 0; k < element.length; k++) {
        var tmp = element[k].innerHTML;
        element[k].innerHTML = '';

        var c = new Parse.Simple.Creole(options);
        c.parse(element[k], tmp, options);
    }
post-body entry-content클래스를 지정해주되지만 일반 HTML태그를 지원해주지 않기때문에 wiki-content클래스를 지정하여 위키마크업을 사용할 부분에만 사용한다.http://fuckthis.com/shitdocument.location -> http://fuckthis.com/shitdocument.location.hostname -> fuckthis.comdocument.location.pathname -> /shithttps://addons.mozilla.org/en-US/firefox/addon/pagesaver/
Note: we are aware of a problem where, on some Windows systems, page captures sometimes fail with an "out of memory" error. This is caused by a Firefox bug that has been fixed; the fix should be included in Firefox 8. In the meantime, please refer to the Known Issues and Limitations for more information including a temporary workaround for this problem.
http://pearlcrescent.com/products/pagesaver/doc/#knownissues
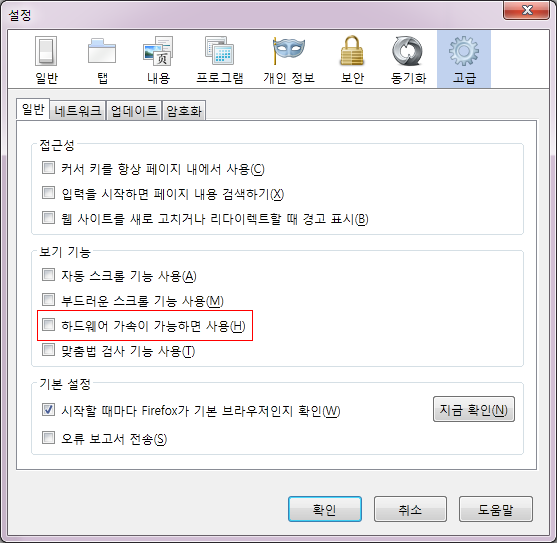
With Firefox 4 and newer on some Windows systems, attempts to capture a page that is taller or wider than 8,192 pixels may fail and an "out of memory" error will be reported. This is caused by Mozilla bug 649924 which occurs when hardware acceleration is used. To work around this problem, follow these steps to disable hardware acceleration:
- Open the Firefox options and view the Advanced panel.
- Within the General tab (Browsing section), uncheck the Firefox option named "Use hardware acceleration when available".
- Restart Firefox.
이 팁은 EA코리아에서 바로 구입한 분들에게만 적용될겁니다.
EADM에서 설치파일 받으려면 속 터집니다.
http://www.bigdownload.com/games/battlefield-bad-company-2/pc/battlefield-bad-company-2-r10-update/
이 후 부터는 EADM없이 설치하실때(bfbc2_dd\Setup.exe) 보관해둔 시디키를 입력하고 바로 설치가 가능합니다.
설치 완료 후 펑크버스터 업데이트와 동시에 메뉴얼패치를 진행할 수 있습니다.
게임을 다 즐긴 후 삭제를 프로그램 추가/제거에서 하면 속터집니다.
시작메뉴의 Deauthorize로 인증을 풀어주신 후 시디키정보가 들어있는 레지스트리를 삭제하신 후 바로 나가시면 안전합니다.
레지스트리 편집기에서 HKEY_LOCAL_MACHINE\SOFTWARE\Electronic Arts\Electronic Arts\Battlefield Bad Company 2\ergc 의 값을 지우시거나 아래 내용을 빈 텍스트 문서에 복사한 후 확장자를 .reg로 변경한 후 실행시켜줍니다.
Windows Registry Editor Version 5.00

[HKEY_LOCAL_MACHINE\SOFTWARE\Electronic Arts\Electronic Arts\Battlefield Bad Company 2\ergc]
@=-
만약 인증전에 레지스트리에있는 시디키를 지우셨다면 Deauthorize를 할 수 없습니다.
이때에는 다시 시디키 정보를 ergc에 입력하신 후 Deauthorize하시면 인증을 풀 수 있습니다.
레지스트리의 시디키 삭제후에도 걱정되시는분은 게임폴더(C:\Program Files\Electronic Arts)를 Shift+Delete키로 지워버리세요. :)
function getElementsByClass(searchClass,node,tag) {
    var classElements = new Array();
    if ( node == null )
        node = document;
    if ( tag == null )
        tag = '*';
    var els = node.getElementsByTagName(tag);
    var elsLen = els.length;
    var pattern = new RegExp('(^|\\\\s)'+searchClass+'(\\\\s|$)');
    for (i = 0, j = 0; i < elsLen; i++) {
        if ( pattern.test(els[i].className) ) {
            classElements[j] = els[i];
            j++;
        }
    }
    return classElements;
}
<meta name="robots" content="noindex, noarchive, nofollow, nosnippet, noodp, notranslate, noimageindex">
<meta name="googlebot" content="noindex, noarchive, nofollow, nosnippet, noodp, notranslate, noimageindex">
<meta http-equiv="cache-control" content="no-cache">
<meta http-equiv="pragma" content="no-cache">
...
]]></b:skin>

<link href='http://alexgorbatchev.com/pub/sh/2.0.320/styles/shCore.css' rel='stylesheet' type='text/css'/>
<link href='http://alexgorbatchev.com/pub/sh/2.0.320/styles/shThemeDefault.css' rel='stylesheet' type='text/css'/>
<script src='http://alexgorbatchev.com/pub/sh/2.0.320/scripts/shCore.js' type='text/javascript'/>
<script src='http://alexgorbatchev.com/pub/sh/2.0.320/scripts/shBrushCpp.js' type='text/javascript'/>
<script src='http://alexgorbatchev.com/pub/sh/2.0.320/scripts/shBrushCSharp.js' type='text/javascript'/>
<script src='http://alexgorbatchev.com/pub/sh/2.0.320/scripts/shBrushCss.js' type='text/javascript'/>
<script src='http://alexgorbatchev.com/pub/sh/2.0.320/scripts/shBrushJava.js' type='text/javascript'/>
<script src='http://alexgorbatchev.com/pub/sh/2.0.320/scripts/shBrushJScript.js' type='text/javascript'/>
<script src='http://alexgorbatchev.com/pub/sh/2.0.320/scripts/shBrushPhp.js' type='text/javascript'/>
<script src='http://alexgorbatchev.com/pub/sh/2.0.320/scripts/shBrushPython.js' type='text/javascript'/>
<script src='http://alexgorbatchev.com/pub/sh/2.0.320/scripts/shBrushRuby.js' type='text/javascript'/>
<script src='http://alexgorbatchev.com/pub/sh/2.0.320/scripts/shBrushSql.js' type='text/javascript'/>
<script src='http://alexgorbatchev.com/pub/sh/2.0.320/scripts/shBrushVb.js' type='text/javascript'/>
<script src='http://alexgorbatchev.com/pub/sh/2.0.320/scripts/shBrushXml.js' type='text/javascript'/>
<script src='http://alexgorbatchev.com/pub/sh/2.0.320/scripts/shBrushPerl.js' type='text/javascript'/>
<script src='http://alexgorbatchev.com/pub/sh/2.0.320/scripts/shBrushBash.js' type='text/javascript'/>
<script src='http://alexgorbatchev.com/pub/sh/2.0.320/scripts/shBrushPlain.js' type='text/javascript'/>

</head>
...
... <script language='javascript'> SyntaxHighlighter.config.bloggerMode = true; SyntaxHighlighter.config.stripBrs = true; SyntaxHighlighter.config.clipboardSwf = 'http://alexgorbatchev.com/pub/sh/2.1.364/scripts/clipboard.swf'; SyntaxHighlighter.all(); </script> </body> </html>
http://pidgin.im/pipermail/devel/2007-November/003967.html
Vishal Rao vishalrao at gmail.com
Tue Nov 6 01:08:27 EST 2007
Hello,
I'm writing a libpurple plugin (cross-platform Windows and Linux/Unix)
and I need to do an FTP upload via code. Can you recommend some
quick/easy library to do an FTP upload which also compiles/works on
Windows and Linux?
Thanks,
Vishal Rao
--
"Thou shalt not follow the null pointer for at it's end madness and chaos lie."
http://pidgin.im/pipermail/devel/2007-November/003968.html
Casey Harkins caseyharkins at gmail.com
Tue Nov 6 01:41:18 EST 2007
libcurl perhaps? Never used it, so I'm not sure about quick/easy, but it
does support most platforms (including Windows, Linux and most flavors
of Unix) and multiple protocols.
http://curl.haxx.se/libcurl/
-casey
http://pidgin.im/pipermail/devel/2007-November/003971.html
Vishal Rao vishalrao at gmail.com
Tue Nov 6 08:29:02 EST 2007
thanks, i've started to use the libcurl which comes with cygwin and my
libpurple plugin compiles under windows/cygwin/mingw.
problem is, when i include curl and call its init and cleanup
functions in the plugin code, the plugin no longer shows up in
pidgin's plugin list to load! the plugin works again when i comment
out the curl code... im statically linking curl and my plugin dll size
goes up from about 100k to 500k.
any ideas as to why this is happening and how to get it to work?
--
"Thou shalt not follow the null pointer for at it's end madness and chaos lie."
http://pidgin.im/pipermail/devel/2007-November/003972.html
Daniel Atallah daniel.atallah at gmail.com
Tue Nov 6 09:10:12 EST 2007
The problem is likely that you're using the cygwin-dependent libcurl.
The reason that your plugin no longer appears is that it probably
can't find cygwin1.dll, which libcurl needs. Using the MS dependency
checker application on your plugin dll will verify this. Pidgin (on
Windows) is a native win32 application, so you should use a natively
compiled libcurl instead and avoid having these problems.
-D
http://pidgin.im/pipermail/devel/2007-November/003977.html
Vishal Rao vishalrao at gmail.com
Tue Nov 6 11:19:38 EST 2007
Yup, it did seem to have a dependency on cygwin. So I built libcurl
myself and rebuilt the plugin. Still see the same problem. Dependency
walker shows dependency on libpurple.dll and dwmapi.dll which is the
same as the working plugin without curl.
If I comment out the calls to curl's init and cleanup, the plugin
loads. I moved the calls to other functions and not the plugin's
init/load, still the plugin does not load if I include curl calls...
--
"Thou shalt not follow the null pointer for at it's end madness and chaos lie."
http://pidgin.im/pipermail/devel/2007-November/003980.html
Vishal Rao vishalrao at gmail.com
Tue Nov 6 11:36:42 EST 2007
Doh, nevermind. I just needed to place libcurl.dll in Pidgin's folder
not in the plugins subfolder. Static linking is giving me linker
errors so I'm using the curl dll.... thanks!
--
"Thou shalt not follow the null pointer for at it's end madness and chaos lie."
http://pidgin.im/pipermail/devel/2007-November/003988.html
Vishal Rao vishalrao at gmail.com
Wed Nov 7 00:46:56 EST 2007
FYI I've attached my libpurple plugin code for any comments on it.
It's supposed to be a "webaware" plugin similar to miranda-im's
webaware plugin which uploads your status so you can display it on
your webpage.
I'm writing it mostly for myself because I didn't find an existing
replacement plugin for Pidgin which I'm starting to use on Linux and
Windows... I hope there doesn't already exist a similar plugin for
Pidgin which I could just use?
--
"Thou shalt not follow the null pointer for at it's end madness and chaos lie."
-------------- next part --------------
A non-text attachment was scrubbed...
Name: webaware.c
Type: text/x-csrc
Size: 11254 bytes
Desc: not available
Url : http://pidgin.im/pipermail/devel/attachments/20071107/eeedb93a/attachment-0001.c
/*
 * WebAware (version 0.0.3) libpurple plugin.
 *
 * Copyright (C) 2007 Vishal Rao <vishal.rao@lahsiv.net>
 *
 * This program is free software; you can redistribute it and/or modify
 * it under the terms of the GNU General Public License as published by
 * the Free Software Foundation; either version 2 of the License, or
 * (at your option) any later version.
 *
 * This program is distributed in the hope that it will be useful,
 * but WITHOUT ANY WARRANTY; without even the implied warranty of
 * MERCHANTABILITY or FITNESS FOR A PARTICULAR PURPOSE. See the
 * GNU General Public License for more details.
 *
 * You should have received a copy of the GNU General Public License along
 * with this program; if not, write to the Free Software Foundation, Inc.,
 * 59 Temple Place - Suite 330, Boston, MA 02111-1307, USA.
 * http://www.gnu.org/copyleft/gpl.html
 */

/**
 * This is a libpurple plugin which places your IM status on FTP or local directories.
 * It is useful for displaying your status on your website.
 */

/*
Changelog:

0.0.3 (Nov 6th, 2007) :
Now using libcurl and glib threads/mutexes for the (hardcoded for me) FTP upload.

0.0.2 (Oct 9th, 2007) :
Now just listens to account-status-changed signals.

0.0.1 (Oct 9th, 2007) :
First cut based on helloworld.c hardcoded only for MSN, Yahoo and GoogleTalk.
Can only listen to signed-on and signed-off signals.
Does not store status anywhere in this version.
*/

/*
TODO :

1. Actually place status on multiple FTP and local dirs.
2. Handle all available protocols not just MSN, Yahoo and GoogleTalk.
3. Use Pref API to load/store config along with UI.
*/

#define PURPLE_PLUGINS

#include <glib.h>

#ifndef G_GNUC_NULL_TERMINATED
  #if __GNUC__ >= 4
    #define G_GNUC_NULL_TERMINATED __attribute__((__sentinel__))
  #else
    #define G_GNUC_NULL_TERMINATED
  #endif /* __GNUC__ >= 4 */
#endif /* G_GNUC_NULL_TERMINATED */

#include "plugin.h"
#include "version.h"
#include "request.h"
#include "notify.h"
#include "connection.h"
#include "signals.h"
#include "util.h"

#include <curl/curl.h>

CURL * g_curl = NULL;

char g_curldata[500] = {0};
int g_curldatalen = 0;

GMutex * g_statusmutex = NULL;
GMutex * g_threadmutex = NULL;

int g_threadstarted = 0;
GThread * g_thread = NULL;
GError * g_error = NULL;

PurplePlugin * g_plugin = NULL;

/*
 * Connection protocol_id list:
 * MSN is "prpl-msn"
 * Yahoo is "prpl-yahoo"
 * GTalk is "prpl-jabber"
 */

PurpleConnection * g_msn = NULL;
PurpleConnection * g_yahoo = NULL;
PurpleConnection * g_gtalk = NULL;

gulong g_statusid = 0;

char g_msnstatus[100] = {0};
char g_yahoostatus[100] = {0};
char g_gtalkstatus[100] = {0};

static void
check_connection(PurpleConnection * conn)
{
  const char * msn = NULL;
  const char * yahoo = NULL;
  const char * gtalk = NULL;

  if (!g_msn)
  {
    msn = purple_strcasestr(conn->account->protocol_id, "prpl-msn");

    if (msn)
    {
      g_msn = conn;
      return;
    }
  }

  if (!g_yahoo)
  {
    yahoo = purple_strcasestr(conn->account->protocol_id, "prpl-yahoo");

    if (yahoo)
    {
      g_yahoo = conn;
      return;
    }
  }

  if (!g_gtalk)
  {
    gtalk = purple_strcasestr(conn->account->protocol_id, "prpl-jabber");

    if (gtalk)
    {
      g_gtalk = conn;
      return;
    }
  }
}

static void
update_status(PurpleConnection * conn, char * gstatus)
{
  GList * statuses = NULL;
  GList * statusitem = NULL;
  PurpleStatus * status = NULL;
  PurpleStatusType * statustype = NULL;
  PurpleStatusPrimitive statusprimitive = PURPLE_STATUS_UNSET;

  g_strlcpy(gstatus, "Unknown", 99);

  statuses = purple_presence_get_statuses(conn->account->presence);

  statusitem = g_list_first(statuses);

  g_mutex_lock(g_statusmutex);

  while (statusitem)
  {
    status = (PurpleStatus *) statusitem->data;

    if (purple_status_is_active(status))
    {
      statustype = purple_status_get_type(status);

      statusprimitive = purple_status_type_get_primitive(statustype);

/*
      purple_notify_message(g_plugin, PURPLE_NOTIFY_MSG_INFO, conn->account->protocol_id,
        purple_primitive_get_name_from_type(statusprimitive), NULL, NULL, NULL);
        */

      g_strlcpy(gstatus, purple_primitive_get_name_from_type(statusprimitive), 99);
    }

    statusitem = g_list_next(statusitem);
  }

  g_mutex_unlock(g_statusmutex);
}

// curlreader is the "data provider" for the libcurl ftp upload
static size_t
curlreader(void *ptr, size_t size, size_t nmemb, void *stream)
{
  static int total = 0;
  int current = 0;

  while (total < g_curldatalen && current < size*nmemb)
  {
    *(((char*)ptr)+current) = *(((char*)stream)+total);

    total++;
    current++;
  }

  if (current == 0) total = 0;

  return current;
}

// uploader is the thread which waits 10s before performing the upload
static gpointer
uploader(gpointer data)
{
  CURLcode result;
  //GTimer * timer = NULL;

  //sleep(10000); // wait 10 seconds before uploading status...

  /*
  timer = g_timer_new();
  g_timer_start(timer);
  while(g_timer_elapsed(timer, NULL) < 10.0);
  g_timer_destroy(timer);
  */

  g_usleep(10000000); // wait 10 seconds before uploading status...

  // currently uploading miranda-im's webaware_data.js file format!

  g_mutex_lock(g_statusmutex);
  strcpy(g_curldata, "initArray(4);\n");
  strcat(g_curldata, "addData(new Array(\"CSTIME\", 2007, 11, 06, 15, 00, 00));\n");
  strcat(g_curldata, "addData(new Array(\"STATUS\", \"JABBER\", 40071, \"");
  strcat(g_curldata, g_gtalkstatus);
  strcat(g_curldata, "\", \"Nope, not here.\"));\n");
  strcat(g_curldata, "addData(new Array(\"STATUS\", \"MSN\", 40071, \"");
  strcat(g_curldata, g_msnstatus);
  strcat(g_curldata, "\", \"Nope, not here.\"));\n");
  strcat(g_curldata, "addData(new Array(\"STATUS\", \"YAHOO\", 40071, \"");
  strcat(g_curldata, g_yahoostatus);
  strcat(g_curldata, "\", \"Nope, not here.\"));\n");
  g_mutex_unlock(g_statusmutex);
  g_curldatalen = strlen(g_curldata);

  g_curl = curl_easy_init();
  // upload to ftp
  if (g_curl)
  {
    curl_easy_setopt(g_curl, CURLOPT_UPLOAD, 1);
    curl_easy_setopt(g_curl, CURLOPT_URL, "ftp://user:pass@site.tld/folder/file");
    curl_easy_setopt(g_curl, CURLOPT_READDATA, g_curldata);
    curl_easy_setopt(g_curl, CURLOPT_READFUNCTION, &curlreader);
    result = curl_easy_perform(g_curl);
    curl_easy_cleanup(g_curl);
  }

  g_mutex_lock(g_threadmutex);
  g_threadstarted = 0;
  g_mutex_unlock(g_threadmutex);

  return NULL;
}

static void
save_status(const char * gstatus)
{
  g_mutex_lock(g_threadmutex);

  if (g_threadstarted == 0)
  {
    g_thread = g_thread_create(&uploader, NULL, FALSE, &g_error);
    g_threadstarted = 1;
  }

  g_mutex_unlock(g_threadmutex);
}

static void
save_status2(const char * gstatus)
{
  CURLcode result;

  // TODO : Read prefs and save status to FTP and/or local dir.
  /*
  purple_notify_message(g_plugin, PURPLE_NOTIFY_MSG_INFO, "Save Status",
    gstatus, NULL, NULL, NULL);
  */
  g_curl = curl_easy_init();
  // upload to ftp
  if (g_curl)
  {
    curl_easy_setopt(g_curl, CURLOPT_UPLOAD, 1);
    curl_easy_setopt(g_curl,CURLOPT_URL, "ftp://user:pass@site.tld/folder/file");
    curl_easy_setopt(g_curl, CURLOPT_READDATA, g_curldata);
    curl_easy_setopt(g_curl, CURLOPT_READFUNCTION, &curlreader);
    result = curl_easy_perform(g_curl);
    curl_easy_cleanup(g_curl);
  }
}

static void
update_and_save_status(PurpleConnection * conn)
{
  const char * msn = NULL;
  const char * yahoo = NULL;
  const char * gtalk = NULL;

  msn = purple_strcasestr(conn->account->protocol_id, "prpl-msn");
  yahoo = purple_strcasestr(conn->account->protocol_id, "prpl-yahoo");
  gtalk = purple_strcasestr(conn->account->protocol_id, "prpl-jabber");

  if (msn)
  {
    update_status(g_msn, g_msnstatus);
    save_status(g_msnstatus);
  }
  else if (yahoo)
  {
    update_status(g_yahoo, g_yahoostatus);
    save_status(g_yahoostatus);
  }
  else if (gtalk)
  {
    update_status(g_gtalk, g_gtalkstatus);
    save_status(g_gtalkstatus);
  }
}

static void
account_status_changed(PurpleAccount *account, PurpleStatus *old, PurpleStatus *new, gpointer data)
{
  PurpleConnection * conn = NULL;
  /*
  purple_debug_misc("signals test", "account-status-changed (%s, %s, %s)\n",
          purple_account_get_username(account),
          purple_status_get_name(old),
          purple_status_get_name(new));
  */

  /*
  char msg[100] = {0};

  g_snprintf(msg, 99, "account: %s, old: %s, new: %s", purple_account_get_protocol_name(account),
    purple_status_get_name(old), purple_status_get_name(new));

  purple_notify_message(g_plugin, PURPLE_NOTIFY_MSG_INFO, "Account Status Changed",
    msg, NULL, NULL, NULL);
  */

  conn = purple_account_get_connection(account);
  check_connection(conn);
  update_and_save_status(conn);
}

static gboolean
plugin_load(PurplePlugin * plugin)
{
  /*
  purple_notify_message(plugin, PURPLE_NOTIFY_MSG_INFO, "WebAware Load",
    "plugin_load() called", NULL, NULL, NULL);
  */

  /*
  g_signonid = purple_signal_connect(purple_connections_get_handle(), "signed-on", g_plugin,
    PURPLE_CALLBACK(signed_on_cb), NULL);

  g_signoffid = purple_signal_connect(purple_connections_get_handle(), "signed-off", g_plugin,
    PURPLE_CALLBACK(signed_off_cb), NULL);
  */

  /*
  g_statusid = purple_signal_connect(purple_connections_get_handle(), "savedstatus-changed", g_plugin,
    PURPLE_CALLBACK(savedstatus_changed_cb), NULL);
  */

  g_statusid = purple_signal_connect(purple_accounts_get_handle(), "account-status-changed", g_plugin,
    PURPLE_CALLBACK(account_status_changed), NULL);

  g_statusmutex = g_mutex_new();
  g_threadmutex = g_mutex_new();

  return TRUE;
}

static gboolean
plugin_unload(PurplePlugin * plugin)
{
  /*
  purple_notify_message(plugin, PURPLE_NOTIFY_MSG_INFO, "WebAware UnLoad",
    "plugin_unload() called", NULL, NULL, NULL);
  */

  purple_signals_disconnect_by_handle(g_plugin);

  g_mutex_free(g_statusmutex);
  g_mutex_free(g_threadmutex);

  return TRUE;
}

static void
plugin_destroy(PurplePlugin * plugin)
{
  /*
  purple_notify_message(plugin, PURPLE_NOTIFY_MSG_INFO, "WebAware Destroy",
    "plugin_destroy() called", NULL, NULL, NULL);
  */

  purple_signals_uninit();
  purple_connections_uninit();
}

static PurplePluginInfo
info =
{
    PURPLE_PLUGIN_MAGIC,
    PURPLE_MAJOR_VERSION,
    PURPLE_MINOR_VERSION,
    PURPLE_PLUGIN_STANDARD,
    NULL,
    0,
    NULL,
    PURPLE_PRIORITY_DEFAULT,

    "core-vishalrao-webaware",
    "WebAware",
    "0.0.3",

    "Web Awareness Plugin",
    "The WebAware plugin places your status information on FTP or local directories."
    " It is useful for being able to display your status on your webpage.",
    "Vishal Rao <vishal.rao@lahsiv.net>",
    "http://lahsiv.net/",

    plugin_load,
    plugin_unload,
    plugin_destroy,

    NULL,
    NULL,
    NULL,
    NULL,
    NULL,
    NULL,
    NULL,
    NULL
};

static void
init_plugin(PurplePlugin * plugin)
{
  g_plugin = plugin;
  purple_signals_init();
  purple_connections_init();

  //Note: purple_accounts_init() seems to cause Pidgin to not sign on!
  //purple_accounts_init();
}

PURPLE_INIT_PLUGIN(webaware, init_plugin, info);

// --------- The End ---------
<script type="text/javascript" src"http://static.tumblr.com/q0etgkr/mFbkoqlkr/tumblrautopager.js"></script>
var tumblrAutoPager = {
    url: "http://proto.jp/",
    ver: "0.1.7",
    rF: true,
    gP: {},
    pp: null,
    ppId: "",
    LN: location.hostname,
    init: function ()
    {
        if ($("autopagerize_icon") || navigator.userAgent.indexOf('iPhone') != -1) return;
        var tAP = tumblrAutoPager;
        var p = 1;
        var lh = location.href;
        var lhp = lh.lastIndexOf("/page/");
        var lht = lh.lastIndexOf("/tagged/");
        if (lhp != -1)
        {
            p = parseInt(lh.slice(lhp + 6));
            tAP.LN = lh.slice(7, lhp);
        }
        else if (lht != -1)
        {
            tAP.LN = lh.slice(7);
            if (tAP.LN.slice(tAP.LN.length - 1) == "/") tAP.LN = tAP.LN.slice(0, tAP.LN.length - 1);
        }
        else if ("http://" + tAP.LN + "/" != lh)
        {
            return;
        };
        var gPFncs = [];
        gPFncs[0] = function (aE)
        {
            var r = [];
            for (var i = 0, l = aE.length; i < l; i++)
            {
                if (aE[i].className == "autopagerize_page_element")
                {
                    r = gCE(aE[i]);
                    break;
                }
            }
            return r;
        };
        gPFncs[1] = function (aE)
        {
            var r = [];
            for (var i = 0, l = aE.length; i < l; i++)
            {
                var arr = aE[i].className ? aE[i].className.split(" ") : null;
                if (arr)
                {
                    for (var j = 0; j < arr.length; j++)
                    {
                        arr[j] == "post" ? r.push(aE[i]) : null;
                    }
                }
            }
            return r;
        };
        gPFncs[2] = function (aE)
        {
            var r = [];
            var tmpId = tAP.ppId ? [tAP.ppId] : ["posts", "main", "container", "content", "apDiv2", "wrapper", "projects"];
            for (var i = 0, l = aE.length; i < l; i++)
            {
                for (var j = 0; j < tmpId.length; j++)
                {
                    if (aE[i].id == tmpId[j])
                    {
                        r = gCE(aE[i]);
                        tAP.ppId = aE[i].id;
                        break;
                    }
                }
            }
            return r;
        };
        for (var i = 0; i < gPFncs.length; i++)
        {
            var getElems = gPFncs[i](document.body.getElementsByTagName('*'));
            if (getElems.length)
            {
                tAP.gP = gPFncs[i];
                tAP.pp = getElems[0].parentNode;
                break;
            }
        }
        function gCE(pElem)
        {
            var r = [];
            for (var i = 0, l = pElem.childNodes.length; i < l; i++)
            {
                r.push(pElem.childNodes.item(i))
            }
            return r;
        }
        if (!tAP.pp)
        {
            return;
        }
        sendRequest.README = {
            license: 'Public Domain',
            url: 'http://jsgt.org/lib/ajax/ref.htm',
            version: 0.516,
            author: 'Toshiro Takahashi'
        };

        function chkAjaBrowser()
        {
            var A, B = navigator.userAgent;
            this.bw = {
                safari: ((A = B.split('AppleWebKit/')[1]) ? A.split('(')[0].split('.')[0] : 0) >= 124,
                konqueror: ((A = B.split('Konqueror/')[1]) ? A.split(';')[0] : 0) >= 3.3,
                mozes: ((A = B.split('Gecko/')[1]) ? A.split(' ')[0] : 0) >= 20011128,
                opera: ( !! window.opera) && ((typeof XMLHttpRequest) == 'function'),
                msie: ( !! window.ActiveXObject) ? ( !! createHttpRequest()) : false
            };
            return (this.bw.safari || this.bw.konqueror || this.bw.mozes || this.bw.opera || this.bw.msie)
        }
        function createHttpRequest()
        {
            if (window.XMLHttpRequest)
            {
                return new XMLHttpRequest()
            }
            else
            {
                if (window.ActiveXObject)
                {
                    try
                    {
                        return new ActiveXObject('Msxml2.XMLHTTP')
                    }
                    catch (B)
                    {
                        try
                        {
                            return new ActiveXObject('Microsoft.XMLHTTP')
                        }
                        catch (A)
                        {
                            return null
                        }
                    }
                }
                else
                {
                    return null
                }
            }
        };

        function sendRequest(E, R, C, D, F, G, S, A)
        {
            var Q = C.toUpperCase() == 'GET',
                H = createHttpRequest();
            if (H == null)
            {
                return null
            }
            if ((G) ? G : false)
            {
                D += ((D.indexOf('?') == -1) ? '?' : '&') + 't=' + (new Date()).getTime()
            }
            var P = new chkAjaBrowser(),
                L = P.bw.opera,
                I = P.bw.safari,
                N = P.bw.konqueror,
                M = P.bw.mozes;
            if (typeof E == 'object')
            {
                var J = E.onload;
                var O = E.onbeforsetheader
            }
            else
            {
                var J = E;
                var O = null
            }
            if (L || I || M)
            {
                H.onload = function ()
                {
                    J(H);
                    H.abort()
                }
            }
            else
            {
                H.onreadystatechange = function ()
                {
                    if (H.readyState == 4)
                    {
                        J(H);
                        H.abort()
                    }
                }
            }
            R = K(R, D);
            if (Q)
            {
                D += ((D.indexOf('?') == -1) ? '?' : (R == '') ? '' : '&') + R
            }
            H.open(C, D, F, S, A);
            if ( !! O)
            {
                O(H)
            }
            B(H);
            H.send(R);

            function B(T)
            {
                if (!L || typeof T.setRequestHeader == 'function')
                {
                    T.setRequestHeader('Content-Type', 'application/x-www-form-urlencoded; charset=UTF-8')
                }
                return T
            }
            function K(X, V)
            {
                var Z = [];
                if (typeof X == 'object')
                {
                    for (var W in X)
                    {
                        Y(W, X[W])
                    }
                }
                else
                {
                    if (typeof X == 'string')
                    {
                        if (X == '')
                        {
                            return ''
                        }
                        if (X.charAt(0) == '&')
                        {
                            X = X.substring(1, X.length)
                        }
                        var T = X.split('&');
                        for (var W = 0; W < T.length; W++)
                        {
                            var U = T[W].split('=');
                            Y(U[0], U[1])
                        }
                    }
                }
                function Y(b, a)
                {
                    Z.push(encodeURIComponent(b) + '=' + encodeURIComponent(a))
                }
                return Z.join('&')
            }
            return H
        }
        function addNextPage(oj)
        {
            if (oj.status == 404)
            {
                tAP.remainFlg = false;
                return;
            }
            var d = document.createElement("div");
            d.innerHTML = oj.responseText;
            var posts = tAP.gP(d.getElementsByTagName("*"));
            if (posts.length < 2)
            {
                tAP.rF = false;
                return;
            }
            var hr = document.createElement("hr");
            hr.className = "tumblrAutoPager_page_separator";
            tAP.pp.appendChild(hr);
            d = document.createElement("div");
            d.className = "tumblrAutoPager_page_info";
            d.innerHTML = "<p style='float:left'><a href=http://" + tAP.LN + "/page/" + p + ">Page " + p + "</a></p>
" + "<br style='clear:both' />";
            tAP.pp.appendChild(d);
            for (var i = 0; i < posts.length; i++)
            {
                tAP.pp.appendChild(posts[i]);
            }
            var footer = $("footer");
            footer ? footer.parentNode.appendChild(footer) : null;
            tAP.rF = true;
        }
        watch_scroll();

        function watch_scroll()
        {
            var d = document.compatMode == "BackCompat" ? document.body : document.documentElement;
            var r = d.scrollHeight - d.clientHeight - (d.scrollTop || document.body.scrollTop);
            if (r < d.clientHeight * 2 && tAP.rF)
            {
                tAP.rF = false;
                p++;
                sendRequest(addNextPage, "", "GET", "http://" + tAP.LN + "/page/" + p, true);
            }
            setTimeout(arguments.callee, 200);
        };

        function $(id)
        {
            return document.getElementById(id)
        };
    },
    switchAutoPage: function ()
    {
        this.rF = !this.rF;
        var aE = document.getElementsByTagName('*');
        for (var i = 0, l = aE.length; i < l; i++)
        {
            if (aE[i].className == "tAP_switch")
            {
                aE[i].firstChild.nodeValue = this.rF ? "AutoPage[OFF]" : "AutoPage[ON]";
            }
        }
    }
};
window.addEventListener ? window.addEventListener('load', tumblrAutoPager.init, false) : window.attachEvent ? window.attachEvent("onload", tumblrAutoPager.init) : window.onload = tumblrAutoPager.init;
#!/bin/bash

PREFIX="/home/me/usr"

export PKG_CONFIG_PATH="$PKG_CONFIG_PATH:$PREFIX/libxml/lib/pkgconfig"

PATH="$PATH:$PREFIX/intltool/bin" \

./configure \
--disable-gtkui \
--disable-screensaver \
--disable-sm \
--disable-gtkspell \
--disable-gestures \
--disable-gstreamer \
--disable-gstreamer-interfaces \
--disable-farsight \
--disable-vv \
--disable-idn \
--disable-meanwhile \
--disable-avahi \
--disable-tcl \
--disable-tk \
--disable-pixmaps-install \
--disable-doxygen \
--disable-dot \
--disable-devhelp \
--with-ncurses-headers=$PREFIX/ncurses/include \
--disable-nm \
--disable-perl \
$ make DESTDIR="$PWD/build" install
$ sudo aptitude -t lenny-backports install finch
http://fotobank-textcube.blogspot.com/2010/04/100429-linux에서-특정-텍스트내의-문자열-찾기.html
100429 Linux에서 특정 텍스트내의 문자열 찾기
"가나다" 으로 시작하는건 모두 가져와라~~~(해당 폴더 및 하위폴더)
grep -ir 가나다 * ( 가나다와 * 사이에 한칸 띄워야 함)
"가 나다" 으로 시작하는건 모두 가져와라~~~(해당 폴더 및 하위폴더)
grep -ir 가.나다 * 텍스트사이가 떨어져 있을 경우에는 .으로 표시
http://www.mail-archive.com/libtool@gnu.org/msg10643.html
Hello Alon, and sorry for the delay,
* Alon Bar-Lev wrote on Fri, Jun 06, 2008 at 09:15:37AM CEST:
> > > I want to make a shared library without dependencies. I compile the
> > > dependencies in PIC mode, so it should be compatible.
> Let's say I have liba.la pointing to liba.so* and liba.a(pic)
> installed in my system. I am not building this right now.
> Now, I would like to create moduleb.so that use liba but I do not want
> to have external dependency of liba.so*.
Ah, ok. Libtool doesn't really support this. Well, only with
convenience archives, but not with installed stuff. Here's why:
The general idea is that you should not have multiple entities
of the same code in different libraries, as this can lead to
subtle and difficult-to-analyze bugs. Either your libraries are
shared (and its dependencies are, too), or your libraries are
static, and their code will end up in the final program (but not
in other libraries depending on it). This is how libtool handles
shared libraries and shared modules, and also how it handles
static libraries and dlpreopened modules. Of course the latter
only work with libltdl.
This is also the reason why installing convenience archives is
discouraged: it makes it easy to end up with code being duplicated
into several libraries.
(I suppose you could hack around this by manually copying
libconvenience.la and $(LT_OBJDIR)/libconvenience.a into some installed
location, and use that later; but again, be warned). Maybe libtool
should support this (I think it did at one point in the past), but add a
big fat warning sign. Hmm.
Cheers,
Ralf

http://sectools.org/sniffers.html
Wireshark : Sniffing the glue that holds the Internet together
Wireshark (known as Ethereal until a trademark dispute in Summer 2006) is a fantastic open source network protocol analyzer for Unix and Windows. It allows you to examine data from a live network or from a capture file on disk. You can interactively browse the capture data, delving down into just the level of packet detail you need. Wireshark has several powerful features, including a rich display filter language and the ability to view the reconstructed stream of a TCP session. It also supports hundreds of protocols and media types. A tcpdump-like console version named tethereal is included. One word of caution is that Ethereal has suffered from dozens of remotely exploitable security holes, so stay up-to-date and be wary of running it on untrusted or hostile networks (such as security conferences).
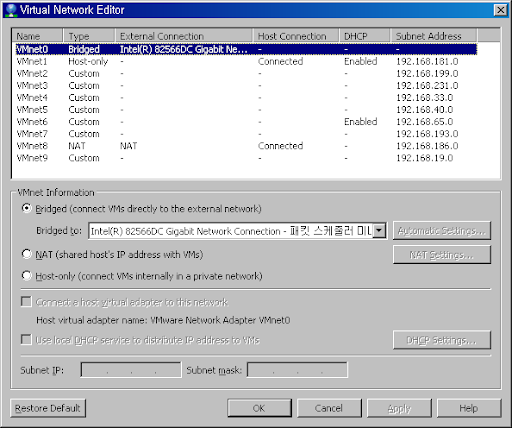
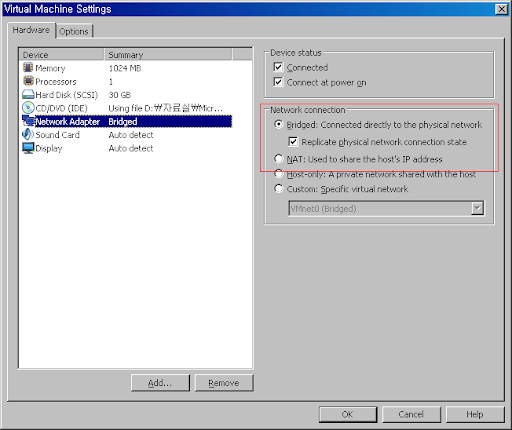
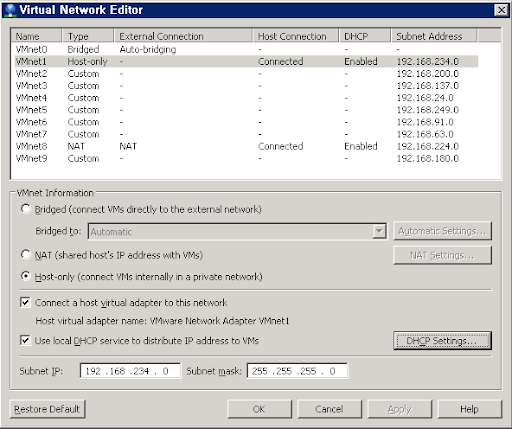
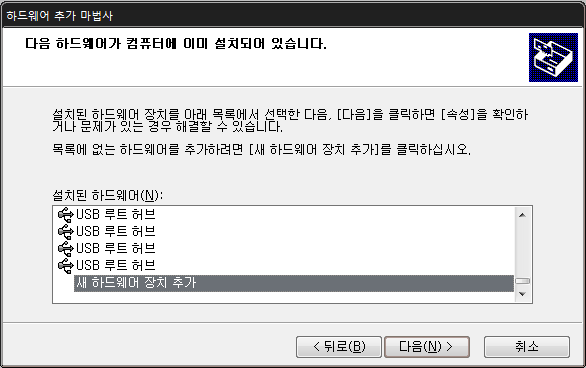
VMware Player 3.0 이후 부터 NAT 등의 네트워크 설정을 해 주는 vmnetcfg.exe가 설치가 되지 않는다고 한다. 그렇지만 설치 파일 안에는 들어있다고 하네요. 먼저 VMware-player-3.0.0-XXX.exe에 /e 옵션을 주어서 실행합니다. 압축 해제만 하는 옵션입니다.VMware-player-3.0.0-203739.exe /e INSTALL_DIR여러 개의 파일이 설치가 되는데 그 중에 network.cab 파일 안에 vmnetcfg.exe가 숨어 있습니다. 그 파일만 꺼내면 됩니다.
http://barosl.com/blog/entry/using-han-eng-key-without-kernel-patch
뿌리 권한으로 다음을 실행합니다:
# setkeycodes 71 122
# setkeycodes 72 123
그다음 xev 를 실행시켜 보면, 커널 패치를 하지 않은 상태에서도 한영키가 122, 한자키가 121 로 인식됩니다!
시스템 시작시에 항상 이 명령이 실행되도록 해 놓는 것이 좋겠죠?
그럼 이제 늘 하던대로 xmodmap 만 먹이면 됩니다. ;)
$ xmodmap -e 'keycode 122 = Hangul'
$ xmodmap -e 'keycode 121 = Hangul_Hanja'
흐흐... 굉장한 팁이군요... 커널 패치의 번거로움이 하나 줄겠네요... ^^
#!/bin/bash
setkeycodes 71 123
setkeycodes 72 122
# update-rc.d hangul_setkeycodes.sh defaults
http://kldp.org/node/52070
참고로 위 환경 변수 내용을 바꾸기 전에 pkg-config를 실행해서, pkg-config가 제대로 설정 파일을 인식했는지 확인할 수도 있습니다:
$ pkg-config --list-all
$ PKG_CONFIG_PATH="$PKG_CONFIG_PATH:/home/me/usr/libxml/lib/pkgconfig" ./configure
$ export PKG_CONFIG_PATH="$PKG_CONFIG_PATH:/home/me/usr/libxml/lib/pkgconfig"
네이트온 3.5-3.7버전 일부(3.7.3.0) 종료안내

좀더 다양한 서비스와 편리한 기능을 제공하기 위해 네이트온 3.5-3.7버전 일부(3.7.3.0) 종료하게 되었습니다.

*종료일시 : 2011년 8월 1일(월)

그동안 네이트온 3.5-3.7버전 일부(3.7.3.0)를 이용해주셔서 감사합니다.
네이트온 최신 버전을 통해 계속해서 서비스를 이용하실 수 있습니다.
( http://nateonweb-stage.nate.com/download/messenger/windows/4.1/download.php )
감사합니다.
http://devday.tistory.com/entry/vi-붙여넣기-시-들여쓰기-문제
vi에서 붙여넣기를 하면 들여쓰기 때문에 본래 모양대로 들어가지 않는다.
이 때 다음과 같이 하면 문제를 해결할 수 있다.
:set paste
입력모드에서 붙여넣기를 한다.
붙여넣기 작업을 완료하면 다음과 같이 원래대로 복원할 수 있다.
:set nopaste
#Minecraft server properties
#Tue Jun 07 18:05:30 KST 2011
level-name=world
view-distance=10
spawn-monsters=true
online-mode=false
spawn-animals=true
max-players=10
server-ip=
pvp=false
level-seed=randomseed
server-port=25565
allow-flight=false
white-list=false
allow-nether=false
public=false
max-connections=1
$ renice +10 PID
# renice -1 PID
includable id 'interval' in widget type 'BlogArchive':
...
<b:includable id='interval' var='intervalData'>
<b:loop values='data:intervalData' var='i'>
<ul class='hierarchy'>
<!--
<li expr:class='"archivedate " + data:i.expclass'>
-->
<li expr:class='"archivedate expanded"'>
<b:include data='i' name='toggle'/>
<a class='post-count-link' expr:href='data:i.url'><data:i.name/></a>
<span class='post-count' dir='ltr'>(<data:i.post-count/>)</span>
<b:if cond='data:i.data'>
<b:include data='i.data' name='interval'/>
</b:if>
<b:if cond='data:i.posts'>
<b:include data='i.posts' name='posts'/>
</b:if>
</li>
</ul>
</b:loop>
</b:includable>
...
http://qaos.com/viewtopic.php?topic=6814&forum=1
아직도 압축해서 전송하는 것이 훨씬 효과적입니다.
전송 오류를 피할 수 있습니다.
가장 쉬운 예로 .AVI 파일을 들겠습니다. 보통 700M짜리 파일이 많으며, MPEG4로 이미 압축되어 있는 경우가많기때문에 압축을 해도 크기는 줄지 않습니다. 그러나 압축을하는 경우 잇점이 있습니다. CRC 기능때문에 전송중 오류가 발생한 경우 오류를 추출할 수 있고, 원하는 경우 복구 기능을 이용해서 복구할 수 있습니다.
그러나 압축을 하지 않고 전송하면 깨진 파일이 그대로 유포될 수 있습니다. 인터넷에 깨진 동영상이 얼마나 많았으면 DIVXPatch 사이트까지 있을까요.
다만 이 경우 압축을 해도 압축 방식은 저장, 복구 기록 넣기를 선택한 후 압축하는 것이 좋습니다(WinRAR의 경우).
많은 수의 파일에 적합합니다.
파일의 수가 많은 경우 전송 중 오류가 날 가능성이 많으며, 폴더 채 업로드해도 하나의 파일을 전송하는 것보다 불편합니다. 아울러 하나의 파일을 전송하고, 다시 전송 준비하는 시간을 고려하면 하나의 파일을 전송하는 시간이 동일한 크기의 여러개의 파일을 전송하는 시간보다 훨씬 빠릅니다.
파일 정보를 유지할 수 있습니다.
파일 정보는 별것 아닌 것 같지만 파일의 생성일, 유닉스의 경우 파일의 권한까지 압축 파일에 포함시킬 수 있습니다. 이와같은 파일 정보는 최신 버전 여부를 확인하거나 파일을 정렬할때 아주 유용합니다.
텍스트 파일의 경우에도 압축하는 것이 좋습니다.
IE에 포함된 기능중 하나가 내용을 중심으로 다운로드하는 기능이 있습니다. 이 말은 확장자가 설서 .REG이고 내용이 텍스트라면 다운이되는 것이 아니라 IE가 직접 출력할 수 있음을 의미합니다. 이 경우 메뉴를 이용해서 저장하는 과정을 추가로 거쳐야 합니다.
이외에도 여러가지가 있지만 일단 생각나는 것만 적어봤습니다.
물론 넷트웍 속도가 빠르기때문에 압축이 필요없을 것 같습니다. 이경우 앞서 언급한 압축 프로그램의 저장 기능을 이용하면 됩니다. 아울러 앞서 언급한 것처럼 설사 다른 방식으로 압축된 동영상이나 음악 파일이라도 압축 후 전송하는 것이 좋습니다.


http://www.coolenjoy.net/bbs/zboard.php?id=votes&no=577
접지란?
접지라 하는 것은 전기를 땅으로 흘려 보내는 겁니다.
왜 땅으로 흘려 보내냐면 지구의 정전용량이 무한대 입니다.
쉽게 말하자면 용량이 무한대인 물탱크와 같습니다.또 저항값도 인간(1000옴정도)이 더 높기 때문에
전기도 물처럼 쉽게 흐를수 있는쪽으로 흐르려 하기 때문에 접지를 하게 되면 사람보단 땅으로 흐르게 되고
수도관이나 건물의 철골에 접지하느게 좋은데 수도관은 도시 전체 지하에 매설되어 있고 또 금속 재질도 되어 있어서 더 그쪽으로 흐르려 하고 더 빨리 지구으로 전기가 흘러 들어가게 됩니다.
그리고 절때 피뢰침과 같이 접지를 해서는 않됩니다. 낙뢰를 맞으면 거기에 연결된 가전제품은 전부 작살이 납니다. 꼭 별도로 접지를 하셔야 합니다.
접지용 콘센트?
접지용 콘센트가 있어도 집안에 접지 시공이 안되어있으면 말짱꽝이죠...벽 콘센트 분해했을대 초록색 전선이 콘센트 한구석에 접지되어있으면 뭐 자연스레 접지가 되는거구요.. 아님 따로 접지를 해야죠.. 저같은 경우엔 집이 오래되서 접지 시공이 되지않은 관계로 가스관 이나 수도꼭지 접지를 주로하는 편이죠................땅속에 쇠막대기박아도 되지만 귀찬아서.. ㅋ
접지 안해도 괜찮던데?
정전기 전압이 수만볼트정도입니다. 왜 감전되 죽지 않냐 하면 정전기에는 전류가 없기 때문입니다..
사람이 감전되 죽는것도 전류가 몸을 통해 흐르기 때문입니다. 정전기에 닿을때 따금 하는것도 전류가 아주 작아서
따금하고 마는 것입니다. 따금 할때 전기가 우리몸을 통해 땅으로 흐르기때문에 그런것입니다.
진호성님 말씀대로 정전기에 의해 사람이 기절하거나 죽을 수도 있습니다.
옥상에 피뢰침이 있어서 접지 않하고 사용합니다.
그럼 그 피뢰침에 접지선을 연결 해보세요..
낙뢰칠때 재수없이 피뢰침에 맞게 되면..
그럼 박정군님 집의 전체 가전제품이 다 작살납니다..차단기가 떨어져도 소용이 없습니다. 낙뢰맞으면
가전제품은 다 작살납니다..
피뢰침 접지와 가정집의 접지는 완전히 차원이 다릅니다..
물넣고쓰는 전기제품은 꼭 접지 해야겠네요
절때 그렇지 않습니다. 그렇게 따지면 커피포트, 냉장고, 믹서기등만 접지를 해야 겠네요..
세탁기경우는 감전에 대한것에 대해 접지가 필요하겠지만 정전기등의 이상전압으로부터
회로를 보호하기 위해서 접지를 하는것입니다.
요즘 접지를 안해도 되는 이유
접지 안해도 되는 이유는 요즘 콘센트에는 접지선이 이미 들어가 있어서 그쪽으로 전자제품에 해가되는 전기가 그쪽으로
흐르지만 하지만 전원플러그에 접지선이 포함되지 않았다거나 또는 콘센트에 접지선이 설치되어 있지 않으면 무용지물이겠죠...
낙뢰에 대한 대비도 있겠지만...일단 낙뢰에 맞으면 접지고 뭐고 차단기고 뭐고 소용이 없습니다..워낙 전압이 높기 때문에
소용이 없다고 해도 과언이 아닙니다. 전기설비에서의 접지와 전자회로의 접지와는 좀 다릅니다.
전기설비에서는 인체의 감전방지를 위한 것이고 전자회로의 접지는 오동작으로 일으키는 기생전류를 대지로 방전시키기 위함에 있습니다..컴퓨터의 수 많은 부품이 중에 몇개가 오동작을 하면 그 타격은 당해보면 아시겠죠..ㅎㅎ;;
제품이 최신형이건 구형이건 접지는 안해된다는 것은 정답이 아닙니다.맨 위에서와 같은 경우에서나 안해도 되겠지만
그렇지 아니할 경우에는 접지를 하는 것이 낫다고 할수 있습니다.
요즘 차단기가 잘되어있어서 과전류가 흐르면 차단기가 먼저 작동되지 않을까요?
차단기에는 합선(합선이되면 보통전류의 10배정도가 흐르게 됨)이나 누전, 과전류로 부터 인체 및 제품을 보호하기 설치하는것입니다. 허나 가전제품에 설치하는 접지는 정전기(전압은 엄청 높으나 전류가 없기때문에 차단기에서는 감지할수 없습니다.)나 외부에서 가해지는 전압으로 부터 전자제품의 회를 보호하기 위해서 접지를 하는 것입니다.예로 정전기의 높은 전압이 직류전압 5~10V정도 쓰는 전자회로에 통하게 된다면 회로의 모든 부분이 못쓰게 됩니다. 이를 방지하기 위해 접지를 하는 것입니다. 아파트같은 경우야 접지시설이 잘되어 있어서 콘센트도 접지선이 들어가 있어서 그나마 괜찮지만 그렇지 않을수 있는 가정집에서는 되도록 해주는게 좋습니다..
원래 콘센트에 접지가 다 되어있는걸로 아는데요
콘센트와 사용하시는 전자제품 전원 플러그에 접지선이 되어 있다면 않하셔도 됩니다..

Windows Registry Editor Version 5.00

[HKEY_CURRENT_USER\Software\Valve\Half-Life\Settings]
"User Token 2"=""
 |
| 빨간선 안의 값이 서버에 복사할 공개키이다. |
 |
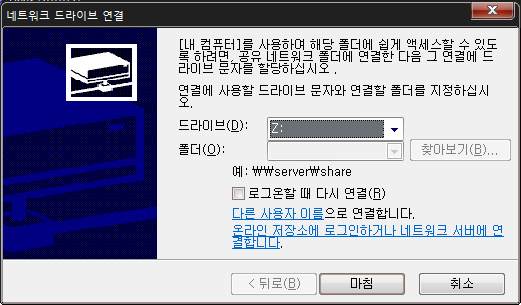
| Browse 버튼을 눌러서 키파일을 찾아 선택 |
 |
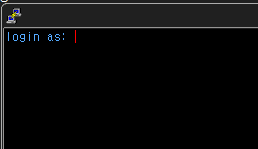
| 로그인할 아이디를 적어넣는다. |
$ mysqldump -u ID -p DBNAME (TABLENAME) > FILEPATH
$ mysqldump -u userid -p testdb > testdb.dump
mysqldump: Got error: 1044: Access denied for user 'userid '@'localhost' to database 'testdb' when using LOCK TABLES
$ mysqldump -u userid -p --lock-all-tables testdb > testdb.dump
$ mysql -u ID -p DBNAME (TABLENAME) < FILEPATH
$ mysql -u userid -p testdb < testdb.dump
http://adelward.tistory.com/tag/Aperture%20Size
별거아니지만 잘못 건드리면 부팅조차 안되는 AGP aperture size 항목에 대해 알아보도록 하자
바로 AGP Aperture Size 라는 항목이다. 최근의 3D 게임은 화려한 그래픽과 웅장한 사운드로 무장하는 경우가 많은데, 3D 그래픽 구현시 보다 사실적인 오브젝트 구현을 위하여, 다수의 폴리건 및 대용량 다중 멀티 텍스쳐를 사용하는 경우가 점점 더 늘어나고 있다. 여기서 문제가 되는 점이 바로 텍스쳐 메모리의 한계 문제이다. 현재 국내에서 시판되고 있는 GeForce2/3 계열이나 RADEON 제품의 상위 모델들은 기본적으로 64MB 의 메모리를 가지고 있기에 그다지 부족함이 없다고 볼 수 있지만, 차세대 3D 게임에서는 이마저도 부족한 사양이 될 수도 있을 것이다.
(텍스쳐라는 것은 3D로 모델링된 물체의 표면에다가 2D의 비트맵 이미지를 덧씌워 주는 것입니다. 이게 뭐 그리 어렵냐 하면… 엄청 어렵습니다. 왜냐하면 3D공간상에서 볼 때 2D 텍스쳐들은 평면 입니다. 때문에 입체로 구성된 물체에 입히게 되면 왜곡이 일어나게 되죠. 그래서 텍스쳐를 만들때는 외곡되는 부분까지 생각해서 만들어줘야 합니다.)
관련 NAVER 지식인을 살펴보자면, 게이머들에게 흥미로운 사실하나가 밝혀진다.
"3d게임에서 다수의 옵젝트(캐릭터 몬스터등이 수많을때)가 존재해서 버벅일때 저의 경우 라뎅9000 64mb,aperture 64mb 일때 버벅이던것이(프레임 스킵이 아닌 버벅~!) 똑같은 상황에서 aperture 256mb일때 프레임 씹는건 여전히 심하지만 버벅이지 않더군요"
AGP는 다음과 같은 내용으로 구성된다
When using an AGP card the video memory on the graphics adapter is mapped into the 4 GB memory address space (above the region of the physical installed memory). Any accesses to this memory region are directly forwarded to the video memory, greatly increasing transfer rates. However in earlier days of video cards graphics memory was rather limited and ran out quickly (a single 32-bit 512x512 MIP-mapped texture consumes ~1.5 MB) so AGP added a mechanism to use the system`s main memory as additional storage for graphics data such as textures. This is what the AGP Aperture is. Usually directly below the mapped video memory the system reserves a contiguous space of addresses the size of your Aperture (no physical memory will be consumed at this time).
AGP그래픽카드를 사용할때 (컴퓨터에 장착된 메인 메모리를 초과하여) 4기가까지 맵핑(당연히 3D를 말하지요)이 된다. 메모리구역에 대한 어떤 접근도 비디오메모리로 직접 전달되어, 전송율을 매우 높여준다. 하지만 구형 비디오카드들의 메모리는 2M,4M,8M식으로 가용메모리가 제한되어있고, 금방 바닥나버린다.(32비트 512x512 MIP맵핑질감은 1.5메가를 차지한다) 그래서 AGP카드가 개발되어 남아도는 시스템의 메인메모리를 그래픽카드가 3D텍스쳐맵핑을 할때 쓰기시작했다. 이게 AGP APERTURE의 본질이다. 일반적으로 비디오메모리가 64M일때 이보다 낮은 값의 맵핑자료들은 그래픽카드자체에서 소화한다(그래서 메인메모리를 끌어다 쓰는 일은 없다)
When free video RAM is running low the system dynamically allocates 4K sized pages of system memory for use as AGP Aperture Memory. The problem with this dynamic allocation is that in many cases the pages are spread in a non-contiguous form throughout the physical memory. Accessing these pages directly would hinder performance because of scattering/gathering requiring extra logic. To get around this limitation the GART (Graphics Address Remapping Table) which is implemented in hardware in the Northbridge`s Memory Controller Hub provides an automatic physical-to-physical mapping between the scattered pages and the AGP Aperture.
가용 비디오메모리가 낮다면, 컴퓨터는 메인메모리에 능동적으로 4k정도의 공간을 AGP aperture memory로 할당하여준다. 문제는 능동적으로 메모리를 할당해준다는 것인데, 많은 경우에 본체의 메인메모리의 비연속적인 공간에 뿌려준다는 것이다.(하드디스크 조각모음안해준것과 비슷). 이런 페이지들을 일일이 찾아다니며 읽어들이는 것은 자료수집과 분산을 위한 또다른 기능을 요하므로 오히려 성능을 떨어뜨린다. 이런 한계를 극복하고자 GART라는 것이 개발되었는데 이것은 노쓰브리지의 메모리 컨트롤러 허브라는 것이 추가장착되어 분산된 맵핑자료들과 AGP aperture간에 자동적으로 실제메인메모리의 구역의 맵핑을 연결해주는 식으로 개선되었다.
 |
| Background: R69 G70 B86 |
 |
| Font: R85 G170 B255, Background: R0 G0 B0 |
http://www.teambh.net/bf_tip/1792853
DX를 왜 재설치하냐 윈도우에 설치되있으니 괜찮다 이러시는분들 계시는데. 잘못알고계시는겁니다.
DX가 표면적으로 버전업이되질않아보이지만 실제로는 여러가지 추가 라이브러리가 있기때문에 윈도우7에서도 다이렉트 업데이트를 필히 해주셔야됩니다.
#navbar-iframe {
   display: none !important;
}
code, pre {
   font-family: "Courier New", Courier, Monaco, "Lucida Console", monospace;
   overflow: auto;
   background-color: #E7E7E7;
}
pre {
   -moz-border-radius: 5px;
   -khtml-border-radius: 5px;
   -webkit-border-radius: 5px;
   border-radius: 5px;
}
pre {
   padding: 1em;
   line-height: 1.5em;
   border-width: 1px;
   border-style: solid;
   border-color: #ddd;
   margin: 0.5em 0;
}
...
    <!--No header image -->
    <div id='header-inner'>
      <div class='titlewrapper'>
        <h1 class='title'>
          <a href='/'><b:include name='title'/></a>
        </h1>
...
div.post-body.entry-content h1,
div.post-body.entry-content h2,
div.post-body.entry-content h3,
div.post-body.entry-content h4 {
   color: black;
   background: none;
   font-weight: normal;
   margin: 0;
   padding: .5em 0 .17em 0;
   border-bottom: 1px solid #aaa;
}
div.post-body.entry-content h1 { font-size: x-large;}
div.post-body.entry-content h2 { font-size: large;}
div.post-body.entry-content h3 { font-size: normal;}
div.post-body.entry-content h4 { font-size: small;}
/server listfull
/server add oftc irc.oftc.net/6697 -ssl -autoconnect
/server add oftc6 irc6.oftc.net/6697 -ipv6 -ssl
/server add freenode2 chat.eu.freenode.net/6667,chat.us.freenode.net/6667
/server add freenode3 irc.freenode.net -password=mypass
/server copy oftc oftcbis
/server rename oftc newoftc
/server del freenode
/server deloutq
/server add hanirc irc.hanirc.org/6668
irc.conf

...
[server]
network1.addresses = "irc.server.org/6667"
network1.proxy
network1.ipv6
network1.ssl
network1.ssl_cert
network1.ssl_dhkey_size
network1.ssl_verify
network1.password
network1.sasl_mechanism
network1.sasl_username
network1.sasl_password
network1.sasl_timeout
network1.autoconnect
network1.autoreconnect = off
network1.autoreconnect_delay
network1.nicks = "nick,alter_nick2,alter_nick3"
network1.username = "username"
network1.realname = "realname"
network1.local_hostname
network1.command = ""
network1.command_delay
network1.autojoin
network1.autorejoin = on
network1.autorejoin_delay

network2.addresses = "irc.server.org/6667"
network2.proxy
network2.ipv6
network2.ssl
network2.ssl_cert
network2.ssl_dhkey_size
network2.ssl_verify
network2.password
network2.sasl_mechanism
network2.sasl_username
network2.sasl_password
network2.sasl_timeout
network2.autoconnect
network2.autoreconnect = off
network2.autoreconnect_delay
network2.nicks = "nick,alter_nick2,alter_nick3"
network2.username = "username"
network2.realname = "realname"
network2.local_hostname
network2.command = ""
network2.command_delay
network2.autojoin
network2.autorejoin = on
network2.autorejoin_delay
...
irc.conf

...
[network]
...
default_msg_part = "WeeChat %v"
default_msg_quit = "WeeChat %v"
...
/(스크립트 언어 이름) add (플러그인 파일 경로)
/buffer move (버퍼숫자)
/buffer (네트워크 이름)
/window splith (비율)
/window splitv (비율)
/window merge
$ aptitude -t lenny-backports install weechat-curses weechat-plugins
~/.weechat/perl/autoload$ wget http://www.weechat.org/files/scripts/beep.pl
http://boowoon.egloos.com/2633391
1) iptime, anygate, zio, linksys : 사설 무선랜으로 대부분 비밀번호 없습니다.
2) myLGnet, myLG070 : 123456789a, 987654321a, 1234567890, myLGNetfe07 중에 하나를 사용하시면 됩니다.
3) KT SSID, KT_WLAN : 1234567890, 123456789a, 123456789Cc
4) SK브로드 밴드 : a123456789
5) 세븐 일레븐 : 2127393302
6) Tbroadret : a123456789
7) 맥도날드 : 16005252 (매장 배달 번호와 같습니다.)
8) SKT 와이파이 : sktelecom
출처:갤럭시S 사용자 팁_어플 모음
http://blogname.tistory.com/attachment/cfile2.uf@2076EC0B4CDA9E21345ACA.ext
↓
http://cfile2.uf.tistory.com/attach/2076EC0B4CDA9E21345ACA
http://blogname.tistory.com/attachment/cfile2.uf@2076EC0B4CDA9E21345ACA.ext
↓
http://cfile2.uf.tistory.com/media/2076EC0B4CDA9E21345ACA
<!DOCTYPE html PUBLIC "-//W3C//DTD XHTML 1.0 Transitional//EN" "http://www.w3.org/TR/xhtml1/DTD/xhtml1-transitional.dtd">
<html xmlns="http://www.w3.org/1999/xhtml" xml:lang="en">
$ mysql -u root -p
Enter Password:
Mysql> grant all privileges on mediawiki.* to mediawiki@localhost identified by '******' with grant option;
Mysql> flush privileges;
$ mysql -u mediawiki -p mediawiki < wiki.db.dump
...
## The URL base path to the directory containing the wiki;
## defaults for all runtime URL paths are based off of this.
## For more information on customizing the URLs please see:
## http://www.mediawiki.org/wiki/Manual:Short_URL
$wgScriptPath       = "/mediawiki";
...
...
## Database settings
$wgDBtype           = "mysql";
$wgDBserver         = "localhost";
$wgDBname           = "mediawiki";
$wgDBuser           = "mediawiki";
$wgDBpassword       = "******";
...
source-dir$ dpkg-buildpackage -rfakeroot -uc -b
$ sudo aptitude -t lenny-backports install libpurple0
$ svn export http://dev.haz3.com/svn/nateon/trunk/ pidgin-nateon
pidgin-nateon$ dpkg-buildpackage -rfakeroot -uc -b
pidgin-nateon$ ./configure --prefix=/usr
pidgin-nateon$ make
pidgin-nateon$ make DESTDIR="$PWD/build" install
... Package:pidgin-nateon-> finch-nateon ... Depends:pidgin-> finch ...
pidgin-nateon$ dpkg-deb --build finch-nateon
finch-nateon.deb -> finch-nateon_2.5.6-svn143_i386.deb
$ sudo dpkg -i finch-nateon_2.5.6-svn143_i386.deb