Shouldn't be a problem with .htaccess, depending on what the host has allowed. You could try putting a .htaccess in the sub-folder withAllow From All Satisfy Any
Apache authentication : allow public access to a subdirectory
Create md5sum for Debian package
$ md5sum `find usr -type f | grep -v '^[.]/DEBIAN/'` > DEBIAN/md5sums
ffmpeg m2ts to mkv (dts -> ac3) command
ffmpeg -y -i input.m2ts -scodec copy -vcodec copy -acodec ac3 -f matroska output.mkv
Apache: mod_proxy, mod_proxy_html 사용하기
mod_proxy모듈로 내부 백엔드 서버에 Apache를 통해 접속할 수 있고 mod_proxy_html모듈로 그 서버의 내부 소스들(HTML, Javascript, etc)에서 링크된 상대/절대 경로들을 원하는 경로로 바꿀 수 있다.
데비안 Stable 패키지를 설치하거나 소스에서 빌드하여 바로 설치하거나 빌드된 바이너리를 패키징하여 설치할 수 있다.
Download & Build from source for Apache2 using apxs2
$ apt-get install apx2 libxml2-dev
mod_xml2enc
mod_xml2enc모듈은 지원하지 않는 인코딩들을 지원하게 해준다.
$ ./apxs -c -I/usr/include/libxml2 /usr/local/src/mod_xml2enc/mod_xml2enc.c
mod_proxy_html
$ ./apxs -c -I/usr/include/libxml2 -I/usr/local/src/mod_xml2enc /usr/local/src/mod_proxy_html/mod_proxy_html.c
Debian Packaging
각 디렉토리에 .libs라는 디렉토리가 생성되었을 것이다. 필요한것은 .so파일이다.
- libapache2-mod-proxy-html_3.1.2_i386디렉토리를 만들고 하위에 DEBIAN디렉토리를 생성한다.
- 생성한 DEBIAN디렉토리 안에 control파일을 만든다. 이 파일은 데비안 공식 패키지에서 추출하여 수정해도 된다.
control:
Package: libapache2-mod-proxy-html Source: mod-proxy-html Version: 3.1.2 Architecture: i386 Maintainer: me <me@localhost> Depends: libc6 (>= 2.7-1), apache2, apache2.2-common, libxml2 (>> 2.5.10) Section: web Priority: optional Description: Apache2 filter module for HTML links rewriting mod_proxy_html is an output filter to rewrite HTML links in a proxy situation, to ensure that links work for users outside the proxy. It serves the same purpose as Apache's ProxyPassReverse directive does for HTTP headers, and is an essential component of a reverse proxy. - libapache2-mod-proxy-html_3.1.2_i386/usr/lib/apache2/modules/디렉토리들을 생성한다음 컴파일된 mod_proxy_html.so파일을 넣는다.
- libapache2-mod-proxy-html_3.1.2_i386/etc/apache2/mods-available/디렉토리들을 생성한다음 생성된 proxy_html.conf파일을 넣어주고 proxy_html.load파일을 만든다.
proxy_html.load:
LoadFile /usr/lib/libxml2.so.2 LoadModule proxy_html_module /usr/lib/apache2/modules/mod_proxy_html.so - 상위 디렉토리(../libapache2-mod-proxy-html_3.1.2_i386)에서 패키징한다.
$ dpkg-deb --build libapache2-mod-proxy-html_3.1.2_i386
- 패키징한 libapache2-mod-proxy-html_3.1.2_i386.deb파일을 설치한다.
- mod_xml2enc모듈도 위와같이 패키징하면 된다.
$ sudo dpkg -i libapache2-mod-proxy-html_3.1.2_i386.deb
Configuration
모듈 설치 이후 /etc/apache2/mods-enabled/에 ../mods-availalbe/하위에 필요한 모듈과 설정파일들을 심볼링 링크한다.
/etc/apache2/mods-enabled$ sudo ln -s ../mods-available/proxy.load
/etc/apache2/mods-enabled$ sudo ln -s ../mods-available/proxy.conf
/etc/apache2/mods-enabled$ sudo ln -s ../mods-available/proxy_http.load
/etc/apache2/mods-enabled$ sudo ln -s ../mods-available/proxy_html.load
/etc/apache2/mods-enabled$ sudo ln -s ../mods-available/proxy_html.conf
/etc/apache2/mods-enabled$ sudo ln -s ../mods-available/xml2enc.load
데비안 Stable 패키지를 설치하였다면 xml2enc는 현재 squeeze배포판에서 지원하지 않는다.
- 3.1 이전 버전의 mod_proxy_html에는 SetOutputFilter proxy-html를 사용하며 3.1 버전부터 ProxyHTMLEnable On를 사용한다.
- 프락시 설정시 끝에 붙는 '/'(슬래시)에 주의.
- mod_proxy_html모듈은 페이지를 필터링할때 모두 UTF-8로 변경하여 필터링하고 출력 인코딩의 기본값도 UTF-8이며 이것을 변경하려면 ProxyHTMLCharsetOut옵션을 사용해야 하지만 이 옵션을 사용하면 UTF-8 출력을 설정된 인코딩으로 다시 인코딩하기 때문에 오버헤드가 발생한다.
- ProxyRequests옵션은 포워드 프록시를 켜는 옵션이며 이 옵션을 인증과정없이 켠다면 자신의 서버가 공개프락시가 되는셈이다.
- RequestHeader unset Accept-Encoding옵션으로 압축되지 않은 응답을 백엔드 서버로부터 전송받아야 mod_proxy_html모듈이 필터링을 할 수 있다.
- 백엔드 서버의 프로토콜이 HTTPS라면 SSLProxyEngine On옵션을 설정해야 한다.
- mod_headers 모듈을 추가한다음 RequestHeader옵션으로 Authorization헤더를 추가함으로써 내부 백엔드 서버에 자동으로 로그인 할 수 있다. 혹은 백엔드 서버의 인증 아이디와 비밀번호가 웹서버와 같아도 헤더가 포워딩되서 자동으로 인증된다.
- RequestHeader set Authorization "Basic BASE64(ID:PASSWORD)"
- 설정에 대한 더 자세한 사항은 아파치 사이트나 모듈 사이트를 참고.
ZNC
ProxyRequests off
<Proxy *>
    Order Allow,Deny
    Allow from all
</Proxy>

Redirect /znc https://server.domain/znc/
ProxyPass /znc/ http://localhost:port/
ProxyHTMLURLMap http://localhost:port/ /znc/
<Location /znc>
    ProxyPassReverse /
    SetOutputFilter proxy-html
    ProxyHTMLURLMap / /znc/
    RequestHeader unset Accept-Encoding
    RequestHeader set Authorization "Basic BASE64(ID:PASSWORD)"
</Location>
최신버전의 mod_proxy_html과 mod_xml2enc모듈을 사용하였더니 인코딩이 부분적으로 깨져서 데비안 squeeze의 기본 패키지로 다운그레이드 하였다.
ZNC는 HTTPSock.cpp의 다음과 같은 소스에 의해 Authorization 헤더가 요청으로 들어온다면, 자동으로 아이디와 비밀번호를 BASE64로부터 산출하여 로그인한다. 이로인해 프록시를 설정한 루트도메인에서 다른 아이디와 비밀번호를 설정하였다면 ZNC Webadmin 페이지 접속시 다른 아이디와 비밀번호로 인해 Login Invalid라는 오류메시지가 출력된다.
HTTPSock.cpp:
} else if (sName.Equals("Authorization:")) {
    CString sUnhashed;
    sLine.Token(2).Base64Decode(sUnhashed);
    m_sUser = sUnhashed.Token(0, false, ":");
    m_sPass = sUnhashed.Token(1, true, ":");
    m_bLoggedIn = OnLogin(m_sUser, m_sPass);
Transmission
ProxyRequests off
<Proxy *>
    Order Allow,Deny
    Allow from all
</Proxy>

Redirect /transmission https://server.domain/transmission/web/
ProxyPass /transmission/ http://localhost:port/transmission/
<Location /transmission>
    ProxyPassReverse /
    RequestHeader set Authorization "Basic BASE64(ID:PASSWORD)"
</Location>
IPTIME 공유기
IPTIME 공유기 웹어드민 페이지를 프록시로 아파치를 통해 HTTPS로 접속하여 사용하려고 하였으나, mod_proxy_html사용시 한글 인코딩이 모두 깨지고 페이지가 자바스크립트로 매우 복잡하게 되어있어서 이를 위한 도메인을 따로 독립적으로 사용하여 mod_proxy_html의 필터링 없이 mod_proxy만 사용하여 도메인의 루트경로에서 사용하였다.
인코딩이 깨지는 원인이 공유기 웹어드민 페이지가 응답을 chunked로 주어서 여기에 버그가 있기때문인줄 알았으나 설치된 Apache 데비안 패키지의 버전과 소스를 보니 이미 해당 버그가 패치된 Apache를 사용하고 있었다.(http://grokbase.com/t/apache/dev/074bj0x0kr/mod-proxy-buffering-small-chunks)
특히 mod_proxy_html모듈이 공유기 웹어드민 최상위 경로 접속시 자동으로 /login/login.cgi로 리다이렉션 하는데 이는 HTML의 META태그에 의한것이며 이를 필터링하는데 실패하였다.
독립된 도메인을 사용하면서 크로스 도메인으로 본래의 도메인과 인증없이 연동하여 사용하려고 HTTP Digest Authentication 인증 메쏘드를 사용해 보았지만 대부분의 거의 모든 브라우저가 이를 지원하지 않는다.
Most browsers do not respect the Digest "domain" directive and will not resend credentials for other URIs. As far as I know, Opera is the only browser that honors it. For Opera, the server(s) must respond with the same "realm" string for each URI in the domain list. In other words, if domain="/test /example", the server needs to send "Test Realm - example.com" in the WWW-Authenticate header for both of those URIs. I assume Opera does this because it stores H(A1) instead of the actual password for security. Read into RFC2617 for more on this. Here's my cross-browser solution to this problem: http://travisce.com/arest/
HTTP Digest Authentication 인증 메쏘드에 대한 설정법은 따로 포스팅 한다.
References
- http://apache.webthing.com/mod_proxy_html/config.html
- http://www.apachetutor.org/admin/reverseproxies
- http://stackoverflow.com/questions/2444594/apache-mod-proxy-html-on-ubuntu-proxyhtmlenable-not-working
- http://blog.sam-pointer.com/2009/11/17/building-and-installing-mod_proxy_html-and-mod_xml2enc
- http://www.apacheserver.net/Reverse-proxy-with-Apache-breaks-my-preferred-charset-at179072.htm
- http://grokbase.com/t/apache/dev/074bj0x0kr/mod-proxy-buffering-small-chunks
- http://httpd.apache.org/docs/2.4/mod/mod_proxy.html
- http://httpd.apache.org/docs/2.4/mod/mod_proxy_html.html
- http://httpd.apache.org/docs/2.4/mod/mod_proxy_http.html
- http://en.wikipedia.org/wiki/Digest_access_authentication
ZNC: Self-written Query Message Relay, Query Buffering, Webadmin Patch
ZNC(IRC Bouncer)는 자기자신이 상대방에게 보낸 쿼리 메시지(ACTION 포함)를 클라이언트(ZNC 서버에 접속된 클라이언트)들에게 릴레이 시키지 않고 수신된 쿼리 메시지를 포함하여 버퍼링하지 않는다.
이 패치는 내가 상대방에게 보낸 쿼리 메시지들을 다른 클라이언트들에 릴레이 시켜주고, 버퍼링시켜준다.
이 패치를 적용한 이후 Angel이 ZNC를 사용하고 있고, Angel과 Wiz가 쿼리로 대화를 한다는 상황을 가정하여 이를 ZNC에 접속된 클라이언트들의 입장에서 본다면,
| Client 1(현재 사용중인 클라이언트) | Client 2 |
<Angel> hey Wiz? <Wiz> hey Angel! * Angel Waves her hand |
<Wiz> <***> <Angel> hey Wiz? <Wiz> hey Angel! * Wiz <***> * Angel Waves her hand |
위와 같이 내가(Angel) 보낸 메시지들을 상대방의 입장에서 릴레이 시키는 이유는 추측하건데 대부분의 IRC 클라이언트 소프트웨어들이 아래와 같은 구문이 서버측에서 전송되어 온다면(ZNC->Client) 내가 나에게 쿼리메시지를 보낸것으로 해석하기 때문이다.
:Angel!user@mask PRIVMSG Wiz :Message
확인된 클라이언트들 중 위와 같은 구문을 재대로(Angel이 Wiz에게 쿼리메시지를 보낸것으로) 해석하는 클라이언트는 weechat이 있고, 재대로 해석하지 못하는 클라이언트들에는 mIRC, AndChat(android)이 있다. 바운서 서버와 클라이언트끼리의 통신은 일반적이지 않기때문에 대부분의 클라이언트가 지원하지 않을것이다.
Webadmin Patch
Webadmin 패치는 ZNC Webadmin을 Apache웹서버에서 프록시 모듈들(mod_proxy_html 포함)을 이용하여 ProxyPass하여 사용할때 /mods/perform 링크로 이동시 맨끝에 /(슬래시)가 없으면 ZNC 웹서버가 mods/perform/ 으로 리다이렉션 시키는데 이때 맨 처음부분에 슬래시가 없어서 생기는 문제를 해결하였다.
원래 경로가 http://host:port/mods/perform 이지만 ProxyPass를 사용하면서 mod_proxy_html으로 http://host/custom-path/mods/perform/ 으로 경로가 변경되어 생기는 문제인것 같다. 이 패치를 하면 본래의 ZNC 웹서버에서 맨 처음에 슬래시가 두개 붙여질 수도 있다.
Downloads
이 패치를 znc 206버전에 자동으로 적용할 수 있고 다른 버전는 수동으로 적용할 수 있다.
diff: https://gist.github.com/2486642
Debian package: znc_0.206-custom_i386.deb (md5: 844074f55a89987692072ead73953bc5)
참고로 데비안 패키지에는 swig, mod_perl, mod_python 와 같은 스크립트 모듈들이 포함되어 있지 않다.
References
Apache: _default_ VirtualHost overlap on port 443
http://www.twopenguins.it/2011/04/apache-_default_-virtualhost-overlap-on-port-443-the-first-has-precedence/
If you have just added another VirtualHost with SSL and Apache is giving to you this error:
[warn] _default_ VirtualHost overlap on port 443, the first has precedence
Probably you miss a
NameVirtualHost *:443
at the top of your httpd-vhosts.conf file.
Debian
데비안에서는 /etc/apache2/ports.conf 파일안에 <IfModule mod_ssl.c>와 </IfModule>사이에 넣어준다.
Debian .deb package file download and extract or view content
Download .deb package file
$ aptitude download package-name
View content
$ ar tv package-name.deb
Extract
$ ar xv package-name.deb
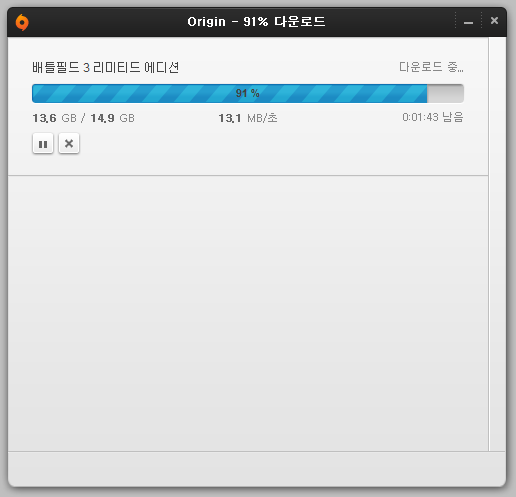
Origin 다운로드 속도는 DNS서버와 관계가 있다.
다운속도가 200KB/s 나오던게 혹시나해서 DNS서버를 자동으로 받게끔(168.126.63.1) 돌려놨더니 12MB/s 씩 뜬다. 바꾸기 전 DNS서버는 8.8.8.8(Google) 이었다.
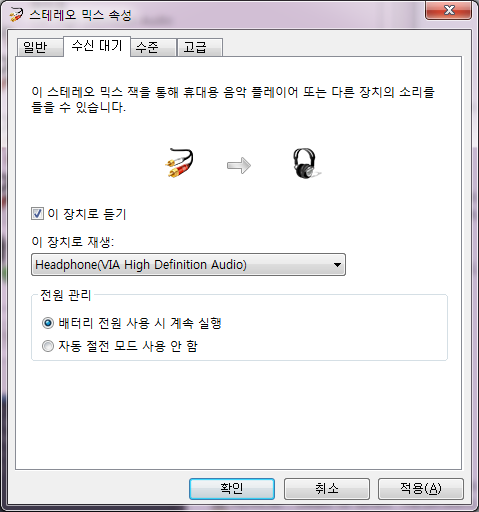
윈도우즈7 스피커와 헤드셋 동시에 오디오 출력하기
It took some time searching around but I finally managed to find an answer by myself, I'm posting the solution here in case anyone has a similar issue:And you're done, the drawback is that you won't have a microphone selected as default recording device, but for what concerns me I couldn't care less.
- Open Sound panel
- Select Speakers as the default playback device
- Go to the "Recording" tab
- Right click and enable "Show Disabled Devices"
- A recording device called "Wave Out Mix", "Mono Mix" or "Stereo Mix" (this was my case) should appear
- Right click on the new device and click "Enable"
- Right click on the new device and click "Set as Default Device"
- Double click on the new device to open the Properties window
- Go to the "Listen" tab
- Click on the "Listen to this device" checkbox
- Select your HDMI device from the "Playback through this device" list
아래처럼 설정해주면 된다. 만약 소리가 안난다면 볼륨을 체크해본다.
Python SocksiPy Global Setting
SocksiPy?
This module was designed to allow developers of Python software that uses the Internet or another TCP/IP-based network to add support for connection through a SOCKS proxy server with as much ease as possible.
Global Setting for urllib2 Example
You can use SocksiPy module. Simply copy the file "socks.py" to your Python's lib/site-packages directory, and you're ready to go. you must use socks before urllib2. For example:You can also try pycurl lib and tsocks, for more detail, click on here.import socks import socket socks.setdefaultproxy(socks.PROXY_TYPE_SOCKS5, "127.0.0.1", 8080) socket.socket = socks.socksocket import urllib2 print urllib2.urlopen('http://www.google.com').read()
TypeError: listdir() argument 1 must be (buffer overflow), not str
Can you please explain what specifically you consider a bug here? I can see that the error message is confusing, so it could be improved. However, there is nothing we can do to make the error go away. The Microsoft C library simply does not support file names longer than MAX_PATH; you have to use Unicode file names to go beyond this limit.
PKCS Padding Method
PKCS 패딩이란 PKCS 산업 표준에서 권고하는 표준 패딩 방법이며, 이곳에 가면 더 많은 패딩 방법들을 볼 수 있다.
패딩을 내부에서 처리해주지 않는 PyCrypto로 AES와 같은 블럭 암호 알고리즘을 사용할때에는 패딩을 직접 구현해야 한다. 하지만 M2Crypto를 사용하면 모듈이 다 알아서 해준다.
Thankfully, there's another options: Me Too Crypto. Unlike PyCrypto, M2Crypto is a Python wrapper around OpenSSL which is nice, as my code will be running under mod_wsgi embedded in Apache along with mod_ssl.
PKCS 표준 패딩 규칙
The rules for PKCS padding are very simple:
- Padding bytes are always added to the clear text before it is encrypted.
- Each padding byte has a value equal to the total number of padding bytes that are added. For example, if 6 padding bytes must be added, each of those bytes will have the value 0x06.
- The total number of padding bytes is at least one, and is the number that is required in order to bring the data length up to a multiple of the cipher algorithm block size.
Some content-encryption algorithms assume the input length is a multiple of k octets, where k > 1, and let the application define a method for handling inputs whose lengths are not a multiple of k octets. For such algorithms, the method shall be to pad the input at the trailing end with k - (l mod k) octets all having value k - (l mod k), where l is the length of the input. In other words, the input is padded at the trailing end with one of the following strings: 01 -- if l mod k = k-1 02 02 -- if l mod k = k-2 . . . k k ... k k -- if l mod k = 0
이렇듯 패딩이 필요하지 않은(l mod k == 0) 마지막 부분에도 무조건(always) 패딩을 추가하는것을 볼 수 있다. 이때 패딩의 개수는 블럭 알고리즘의 블록 크기가 된다.
예시
EXAMPLE 1 Clear text consists of the following18 bytes: F14ADBDA019D6DB7 EFD91546E3FF8444 9BCB In order to make this a multiple of 16 bytes (the AES block size), we must add 14 bytes. Each byte will contain the value 0x0E, which is 14, the total number of padding bytes added. The result is that the padded clear text is as follows: F14ADBDA019D6DB7 EFD91546E3FF8444 9BCB0E0E0E0E0E0E 0E0E0E0E0E0E0E0E The padded value is 32 bytes in length, which is two AES blocks. This padded string is encrypted in CBC mode, and the resulting ciphertext will also be 32 bytes in length. EXAMPLE 1 Clear text consists of the following16 bytes: 971ACD01C9C7ADEA CC83257926F490FF This is already a multiple of the AES block size, but PKCS padding rules say that padding is always applied. Thus, we add 16 bytes of padding to bring the total length to 32, the next multiple of the AES block size. Each pad byte has the value 0x10, which is 16, the total number of padding bytes added. The result is that the padded clear text is as follows: 971ACD01C9C7ADEA CC83257926F490FF 1010101010101010 1010101010101010 The padded value is 32 bytes in length, which is two AES blocks. This padded string is encrypted in CBC mode, and the resulting cipher text will also be 32 bytes in length.
왠지 낭비인것 같지만 표준이 그러니 표준을 따르자면 표준대로 해야겠다.
표준과의 관계
Note that the PKCS standards that define this padding method describe it in a way that limits the maximum padding length to 8 bytes. This is a consequence of the fact that the algorithms at that time used 8-byte blocks. We extend the definition to apply to 16-byte AES cipher blocks.
PKCS 표준에는 패딩의 최대크기가 8바이트이다. 이것은 해당 표준이 제정된 시기에는 블록 알고리즘들의 블록크기가 8바이트였기 때문이다. AES에 적용하기 위해 16바이트로 확장한다.
결국 패딩 방법은 입맛에 맞게 쓰면 되는것 같다.
PKCS#5와 PKCS#7
PKCS#5 padding and PKCS#7 padding are the same (adding bytes 01, or 0202, or 0303 etc up to the length of the block size of the algorithm, 16 bytes in this case).
Method 1 - Pad with bytes all of the same value as the number of padding bytes This is the method recommended in [PKCS5], [PKCS7], and [CMS].
다른 문서에서 같은 메쏘드를 권고하는것 같다.
Python에서 구현하기
pad = lambda s: s + (16 - len(s) % 16) * chr(16 - len(s) % 16)
unpad = lambda s: s[0:-ord(s[-1])]
16은 블럭 알고리즘의 한 블럭의 크기이며 AES사용시 블럭크기가 16이다.
직접 구현해서 테스트해보았다.
import sys

def pad(s):
    pad = 16 - (len(s) % 16)
    pad = chr(pad) * pad
    print 'PADDING:\t', len(pad), [pad]
    return s + pad

def unpad(s):
    i = 1
    print 'PADSIZE:\t', ord(s[-1])
    while i < ord(s[-1]):
        if s[-i] != s[-1]:
            print 'WARNING'
            break
        i += 1
    print 'DATAEND:\t', len(s) - i
    return s[:-i]

print
data = sys.argv[1]
print 'ORIGINAL:\t', len(data), data

padded = pad(data)
print 'PADDED:\t\t', len(padded), [padded]

unpadded = unpad(padded)
print 'UNPADDED:\t', len(unpadded), [unpadded]
print
print unpadded == data
$ python aesfile.py apsdbua0w934bawklbamf.basnbl3wn4balk34bals125 ORIGINAL: 45 apsdbua0w934bawklbamf.basnbl3wn4balk34bals125 PADDING: 3 ['\x03\x03\x03'] PADDED: 48 ['apsdbua0w934bawklbamf.basnbl3wn4balk34bals125\x03\x03\x03'] PADSIZE: 3 DATAEND: 45 UNPADDED: 45 ['apsdbua0w934bawklbamf.basnbl3wn4balk34bals125'] True $ python aesfile.py apsdbua0w934bawklbamf.basnbl3wn4balk34bals123456 ORIGINAL: 48 apsdbua0w934bawklbamf.basnbl3wn4balk34bals123456 PADDING: 16 ['\x10\x10\x10\x10\x10\x10\x10\x10\x10\x10\x10\x10\x10\x10\x10\x10'] PADDED: 64 ['apsdbua0w934bawklbamf.basnbl3wn4balk34bals123456\x10\x10\x10\x10\x10\x10\x10\x10\x10\x10\x10\x10\x10\x10\x10\x10'] PADSIZE: 16 DATAEND: 48 UNPADDED: 48 ['apsdbua0w934bawklbamf.basnbl3wn4balk34bals123456'] True
언패딩 방법이 상당히 집요한데 뒤에서부터 앞으로 마지막 패딩값만큼 반복하면서 자료의 끝(패딩의 시작점 - 1)을 구한다음 짤라 출력한다. 중간에 값이 마지막 패딩값과 다르면 패딩이 잘못 추가된 것이므로 에러(WARNING)을 출력하고 루프를 빠져나온다. 하지만 궂이 이렇게까지 해야할까 하는 의문이 드는데 어차피 마지막 패딩부분에서만 연산하기때문에 속도는 문제될것이 없지만 나중에 잘 구현된 알고리즘을 참고하거나 패딩부분이 구현된 모듈을 써야겠다.
CSS로 마우스 롤오버 이미지링크 만들기
http://perhapsspy.egloos.com/2798445
html:
<a href="archive.html" class="roll">
 <img src="imgs/archive.gif"/>
 <img src="imgs/archive_hover.gif" class="over"/>
</a>
css:
a.roll img.over { display: none;}
a.roll:hover img { display: none;}
a.roll:hover img.over { display: inline;}
Convert string to hex (Python recipe)
encode and decode. this functionality already exists with the encodings library (which is built-in):
>>> "hello".encode("hex")
'68656c6c6f'
>>> "68656c6c6f".decode("hex")
'hello'
>>>
리눅스 환경에서 7za 압축할때 특정파일 제외시키기
http://sourceforge.net/projects/p7zip/forums/forum/383043/topic/1909015
리눅스 환경에선 작은따옴표('')로 -xr옵션을 감싸주어야 에러가 안난다.
7za a -mx9 -ms '-xr!*.m2ts' test.7z
-x와 -xr의 차이
Notice -xr instead of -x. The r indicates recursive so it can match excluded files in deep folder hierarchies.
-xr옵션은 하위의 모든 폴더들에서도 적용된다.
PyCrypto 윈도우즈 환경에서 컴파일하기
PyCrypto는 파이썬 암호화 툴킷이다.
MinGW 설치
C로 작성된 소스들을 컴파일하기위해 MinGW를 설치하였고 설치도중 MSYS 설치해야 autoconf 에러가 안난다.
MSYS is a collection of GNU utilities such as bash, make, gawk and grep to allow building of applications and programs which depend on traditionally UNIX tools to be present. It is intended to supplement MinGW and the deficiencies of the cmd shell.
시스템 환경 변수 수정
설치 이후 환경 변수(컴퓨터 > 고급 시스템 설정 > 고급 탭 > 환경 변수)의 시스템 변수 Path에 아래 경로를 새로 추가해준다. ';'는 경로들을 구분짓기위한 문자이다.
;C:\MinGW\bin;C:\MinGW\msys\1.0\bin
만약 바로 적용이 안된다면 시스템을 재부팅 하거나 레지스트리 HKEY_LOCAL_MACHINE\SYSTEM\CurrentControlSet\Control\Session Manager\Environment의 Path값을 직접 수정한다.
빌드(설치) 하기
컴파일러 옵션 없이 setup.py를 실행하면 vcvarsall.bat를 찾을 수 없다는 에러가 난다. 옵션 --compiler=mingw32를 붙여준다.
python setup.py install --compiler=mingw32
gcc: error: unrecognized command line option '-mno-cygwin'
컴파일 도중 위와 같은 에러가 난다면 C:\python2.x\distutils\cygwinccompiler.py를 직접 수정하여 -mno-cygwin를 찾아 바꿔 모조리 지워버린다.
It sounds like GCC 4.7.0 has finally removed the deprecated -mno-cygwin option, but distutils has not yet caught up with it. Either install a slightly older version of MinGW, or edit distutils\cygwinccompiler.py in your Python directory to remove all instances of -mno-cygwin.
-mno-cygwin옵션은 더이상 사용되지 않는 옵션이며 파이썬 버그리포트 참조.
링크 태그 target을 '_blank'로 자동으로 바꾸기
블로거에 적용하고자 셀렉터를 $('div.post-body a')로 주었다.
<script type='text/javascript'>
  $(document).ready(function(){
    $('div.post-body a').each(function() {
      if ($(this).attr('href')) {
        $(this).attr('target', '_blank');
      }
    });
  });
</script>blockquote cite 속성에 넣은 링크를 자바스크립트로 자동으로 링크걸기
위 사이트에서 소개한 방법은 망할 윈도우즈 익스플로러에서 스타일시트가 적용되지 않기때문에 jQuery를 이용하여 아래와 같이 수정하였고 <head>...</head>사이에 넣어주면 된다.
<script type='text/javascript'>
$(document).ready(function(){
$('blockquote').each(function() {
var citelink = $(this).attr('cite');
if (citelink != '' && citelink != null) {
var cite = document.createElement('cite');
var a = document.createElement('a');
$(a).attr({'href': citelink, 'title': citelink});
$(a).append(citelink);
$(cite).append(a);
$(this).prepend(cite);
}
});
});
</script>스타일시트로 cite를 block으로 만들어준다.
blockquote cite { display: block; margin-bottom: 0.5em; font-style: italic;}이제 아래처럼 cite속성에 링크만 설정해줘도
<blockquote cite="http://support.google.com/blogger/bin/answer.py?hl=en&answer=47270#posts">dateHeader: The date of this post, <b>only present if this is the first post in the list that was posted on this day.</b></blockquote>아래처럼 링크가 걸린다.
dateHeader: The date of this post, only present if this is the first post in the list that was posted on this day.
blockquote cite 속성에 넣은 링크를 CSS로 자동으로 표시하기
http://www.holovaty.com/writing/176/
망할 윈도우즈 익스플로러에선 동작하지 않는다. blockquote태그에 설정한 cite링크를 자동으로 표시하려면 자바스크립트의 도움이 필요하다.
blockquote[cite]:before {
  content: attr(cite);
  display: block;
  margin-bottom: 0.5em;
color: #aaa;}모빌리스에서 제공하는 무료 웹폰트 사용하기
http://api.mobilis.co.kr/webfonts/
모빌리스하면 소액결제밖에 생각이 안나는데 왠 웹폰트인가!? 사이트에서 원하는 폰트를 선택하고 아래와 같이 헤더에 추가한다음 스타일시트에 그냥 폰트 설정하듯이 추가해주면 끝이다. 자세한 사항은 사이트 참조.
<link href='http://api.mobilis.co.kr/webfonts/css/?fontface=NanumGothicWeb' rel='stylesheet' type='text/css'/>
<link href='http://api.mobilis.co.kr/webfonts/css/?fontface=UnDotumWeb' rel='stylesheet' type='text/css'/>
위처럼 추가해 주고 아래처럼 스타일시트에서 설정한다.
.selector { font-family: NanumGothicWeb;}이외에도 웹폰트를 제공하는 서비스들은 cufón, fontface, google 등 엄청많다.
아싸라비야깐따삐야
커널 패닉 이후 자동으로 리붓시키기.
- http://www.cyberciti.biz/tips/reboot-linux-box-after-a-kernel-panic.html
- http://unixfoo.blogspot.com/2009/01/linux-kernel-panic-reboot.html
- http://fghaas.wordpress.com/2007/10/15/how-to-deal-with-kernel-panics-and-oopses-in-ha-clusters/
만약 원격지에 있는 서버가 갑자기 응답하지 않는다면 어떻게 해야 할까. 원격으로 컴퓨터를 조종할 수 있는 IP KVM이나 네트워크 콘솔따위가 없다면, 원격지에 있는 멍청한 서버는 기본값으로 사람이 물리적으로 리셋해줄때까지 기다린다.
설정값이 아래와 같이 설정되어 있다면 해당 시스템은 패닉 후 사람의 손길만을 기다린채 전기만 계속 우걱우걱 하신다.
[root@linux23 ~]# cat /proc/sys/kernel/panic
0
[root@linux23 ~]# sysctl -a | grep kernel.panic
kernel.panic = 0
[root@linux23 ~]#
최근에 내 서버에도 일어난 일이었고, 인터넷으로 온갖 방법을 찾아봤지만 예방법밖에 없다. 결국 커널 패닉 이후 동작을 미리 설정하지 않은 상태에서 일어난 커널 패닉은 원격지에서 물리적인 방법으로 리셋시켜주는 방법밖에 없다.
두가지 커널 옵션이 있다.
- kernel.panic = n : 커널 패닉이 발생했을때 n초 후에 시스템을 리부팅 한다.(0==off)
- kernel.panic_on_oops = 0/1 : 1이면 oops를 커널 패닉으로 간주한다.
바로 적용하려면 아래와 같이 한다.
[root@linux23 ~]# echo "10" > /proc/sys/kernel/panic
0
[root@linux23 ~]# cat /proc/sys/kernel/panic
kernel.panic = 10
[root@linux23 ~]#
영구적으로 적용하고자 /etc/sysctl.conf를 수정한다.
/etc/sysctl.conf:kernel.panic = 10
kernel.panic_on_oops = 1sysrq 명령을 원격으로 할 수 있게 해주는 ipt_sysrq
http://marek.terminus.sk/prog/ipt_sysrq.shtml
Sometimes a remote server hangs and only responds to icmp echo request (ping). Every administrator of such machine is very unhappy because (s)he must go there and press the reset button. It takes a long time and it's inconvenient. So here is a solution. Use the Network Magic SysRq and you will be able to do more than just pressing a reset button. You can remotely sync disks, remount them read-only, then do a reboot. And everything comfortably and only in a few seconds. ;-)
YES!!!
모든 블로거 포스트에 날짜 표시하기
http://www.anshuldudeja.com/2009/11/how-show-post-date-for-blogger-posts.html
블로거는 기본적으로 같은날에 쓴 포스트들에는 날짜를 맨 처음 포스트에만 표시한다. —기본 스킨설정이 날짜는 제목 위에 나타나게 되어 있어서 하위에 다른 포스트들은 그 날짜에 쓰여졌다는걸 암시한다.
dateHeader: The date of this post, only present if this is the first post in the list that was posted on this day.
이와 같은 기본 스킨설정을 입맛에 맞게 바꾸려면 트윅이 필요한데, 스킨을 수정하는 곳에서 Expand Widget Template를 체크한 다음 아래와 비슷한 태그를 찾는다. 해당 태그는 스킨에 따라 다를 수 있어서 만약 찾을 수 없다면 data:post.dateHeader키워드로 검색해본다.
<b:if cond='data:post.dateHeader'>
 <span class='date-header'><data:post.dateHeader/></span>,
</b:if>
해당 if구문을 아래와 같이 변경해준다.
<b:if cond='data:post.dateHeader'>
<script>var dateHeader = '<data:post.dateHeader/>';</script>
<span class='date-header'><data:post.dateHeader/></span>,
<b:else/>
<span class='date-header'><script>document.write(dateHeader);</script></span>,
</b:if><data:post.dateHeader/>가 날짜를 표시해주는 블로거 태그이다. —블로거 템플릿은 마치 서버사이드 스크립트처럼 동작하여서 페이지가 표시될때 치환된다.
data:post.dateHeader에 값이 있으면(참이면: 해당 포스트가 가장 최근의, 가장 위에 자리잡은 포스트이면) 자바스크립트 구문을 실행하여 dateHeader변수에 날짜를 임시 저장한 다음 표시한다. 그다음 포스트에 값이 없으면(거짓이면) 자바스크립트로 임시 저장된 dateHeader를 표시한다. 만약 값이 있으면(참이면) 새로운 날짜에 쓰여진 포스트 이므로 다시 새로운 날짜로 임시 저장되고 이 루틴이 반복된다.
그런데 이상한점은 <script>태그에 type="javascript"옵션을 주면 안된다는 것이다. 자바스크립트를 인라인 스크립트로 사용할땐 생략해야하는 것 같다.
갤럭시S1 스크린샷 찍기
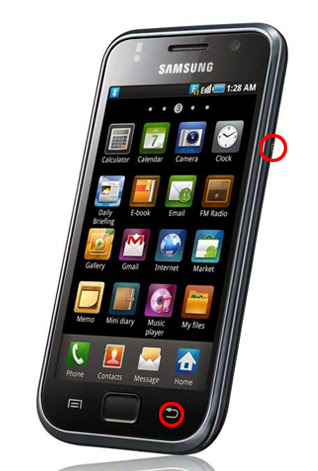
취소 버튼을 누르고 전원키를 누르고 떼면 스크린샷이 찍히고 저장된 사진은 SD카드의 ScreenCapture디렉토리에 들어가 있다. (/mnt/sdcard/ScreenCapture)
그러나 해외판 갤럭시S1에도 똑같이 적용되는지는 미확인, 버튼이 다를것으로 추측됨.
윈도우즈7 네트워크 인터페이스 MTU값 변경하기
http://www.coolenjoy.net/bbs/cboard.php?board=32&no=2255
레지스트리로 바꾸기
레지스트리 HKEY_LOCAL_MACHINE > System > CurrentControlSet > Services > Tcpip > Prameters > Interfaces 에서 하위 노드들에 보면 바꾸고자 하는 인터페이스의 아이피를 속성으로 가지고있는 노드가 있다.
그 노드에서 DWORD 값을 MTU로 새로만들어서 설정하면 된다.
cmd로 바꾸기
netsh interface ipv4 set subinterface "로컬 영역 연결" mtu=XXX store=persistent로컬 영역 연결은 원하는 네트워크 인터페이스 이름으로 지정해준다.
Python handling exceptions
http://docs.python.org/tutorial/errors.html#handling-exceptions
def divide(x, y):
    r = 0
    while r < 3:
        try:
            result = x / y
        except ZeroDivisionError:
            print "division by zero!"
            r += 1
            continue
        else:
            print "result is", result
            return 'haha'
        finally:
            print "executing finally clause"
    return "end"

print divide(2, 3)
위의 예외 구문에서 예외가 발생하지 않을때 return을 한다.
문제는 과연 finally:~ 구문을 실행할까?
result is 0
executing finally clause
haha
return 이전에 finally 구문을 실행하고 return 된다.
Python metaWeblog upload a file using newMediaObject
파일을 읽은 이진데이터를 구조체안에 넣을때 xmlrpclib.Binary()를 써야한다.
import xmlrpclib
import mimetypes

USERID = "userid"
PASSWORD = "password"
BLOGID = 123456 # API KEY
URL = "http://yourblog.com/api"

mw = xmlrpclib.ServerProxy(URL).metaWeblog

# Open file
fp = open("test.jpg", "rb")

# Upload image
url = mw.newMediaObject(BLOGID, USERID, PASSWORD,
                {"name": fp.name, "type": mimetypes.guess_type(fp.name)[0],
                "bits": xmlrpclib.Binary(fp.read())})["url"]

print url